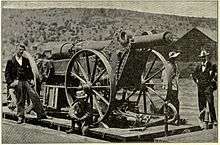
155 mm Creusot Long Tom
| 155 mm Creusot Long Tom | |
|---|---|
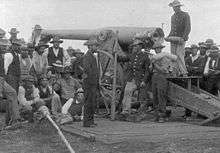 Long Tom being loaded during the siege of Mafeking | |
| Type | siege gun |
| Place of origin | France |
| Service history | |
| In service | 1897 to 1901 |
| Used by | Zuid-Afrikaaansche Republiek |
| Wars | Second Boer War |
| Production history | |
| Designer | Probably De Bange |
| Designed | 1876 |
| Manufacturer | Schneider et Cie, Le Creusot, France |
| Specifications | |
| Weight | 6,500 kilograms (14,300 lb) |
| Length | 7.5 metres (25 ft) |
| Barrel length | 4.2 metres (14 ft) |
| Crew | Commander (warrant officer and six gunners |
|
| |
| Shell | 94 pounds (43 kg) |
| Caliber | 155 millimetres (15.5 cm) |
| Barrels | 1 |
| Action | breech loader |
| Elevation | -13° to 28° |
| Traverse | None |
| Rate of fire | 20 rounds per hour |
| Muzzle velocity | 480 m/s |
| Effective firing range | 9,000 metres (30,000 ft) |
| Maximum firing range | 9,880 metres (32,410 ft) |
| Sights | Tangent sight and quadrant |
The 155 mm Creusot Long Tom was a French siege gun (artillery piece) manufactured by Schneider et Cie in Le Creusot, France and used by the Boers in the Second Boer War as field guns.[1]:p. 164
Four guns, along with 4,000 common shells, 4,000 shrapnel shells and 800 case shot were purchased by the South African Republic (informally known as the Transvaal) in 1897. The guns were emplaced in four forts around the country's capital, Pretoria.[2]
Description
The gun

The Long Tom gun consisted of a barrel and a separate carriage (trail). The barrel was 4,2 metres long and weighed 2,500 kg (49 cwt). The carriage weighed 3,000 kg (59 cwt).[1]:p. 161.
The gun was placed on a wooden platform, consisting of three layers of beams (deals) each measuring 7,5 cm by 7,5 cm by 4,5 m. The size of the platform was 4,5 m by 4,5 m by 22,5 cm. The layers were placed at rectangles to one another. The platform weighed 5,200 kg. The platform had to be placed level in all directions to ensure that the range did not change when the gun pointed in a different direction.[1]:p. 165. Near the "front" of the platform a pivot plate was securely attached to the platform. Recoil was controlled by a hydraulic cylinder which connected the trail to the pivot plate. Chocks were also placed behind the wheels to limit recoil. [1]:p. 164.
To prepare the gun for transport a large tripod was placed over it and, using a block and tackle, the barrel lifted off the front trunnion cups and moved to the back trunnion cups. The trail was then placed on a limber. 16 to 20 oxen were required to pull the gun over hard soil. Two wagons were required to transport the platform and the ammunition was transported on another two wagons.
The ammunition
Cartridge
The propellant charge for the Long Tom was carried in a canvass bag which was about 56 cm long. Black powder was used and this caused a large cloud of white smoke when the gun was fired. The enemy immediately knew where the gun was. [1]:p. 166.
Common shell
The common shell was 42 cm long and weighed 43 kg (94 lb.) It was filled with an explosive called MC 30. The range was 9,880 m. [1]:p. 165.
Fragmentation shell
This shell weighed 41 kg and had a range of 6,800 m. [1]:p. 161. It had a combination percussion cap and time fuse. During the first part of the war the time fuses did not work properly.
Case shot
Case shot was used as a last resort when the enemy's foot soldiers were close to the gun. Case shot was effective up to 400 metres.
Second Boer War
During the Second Boer War the guns were deployed as field guns and siege guns at Vaal Krantz,[3] Ladysmith, Mafeking, Kimberley and Bergendal. During the early stages of the war these guns gave the Boers an advantage as they had longer range than any British guns that were deployed in South Africa at the time.[4] After all their ammunition had been expended, the guns were destroyed one by one, to prevent them from falling into British hands.
Long Tom shells are incorporated in the Honoured Dead Memorial in Kimberley, commemorating those who fell in the town's defence, where they surround the gun called Long Cecil (built in Kimberley during the siege by George Labram, and a catalyst in the Boers bringing Long Tom to the siege).
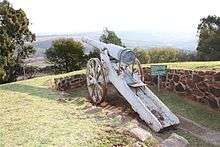
Replicas of the original cannons can be seen at various places in South Africa, including Fort Klapperkop near Pretoria, in the Long Tom Pass in Mpumalanga, The Anglo-Boer War Museum in Bloemfontein (formerly the War Museum of the Boer Republics) and next to the town hall in Ladysmith.
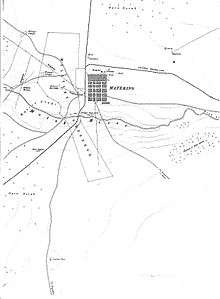
Location of Long Tom emplacements
Pretoria Forts
After the abortive Jameson Raid the government decided to build four forts around the capital, Pretoria. These were called Fort Schanskop, Fort Klapperkop, Fort Daspoortrand and Fort Wonderboompoort. A Long Tom was placed in each fort.
| Fort name | WGS84 | Google Earth search | Coords |
|---|---|---|---|
| Schanskop | 25°46'39"S, 28°11'06"E | Fort Schanskop | 25°46′39″S 28°11′06″E / 25.77750°S 28.18500°E |
| Klapperkop | 25°46'49"S, 28°12'36"E | Fort Klapperkop Heritage Site | 25°46′49″S 28°12′36″E / 25.78028°S 28.21000°E |
| Daspoortrand | 25°43'59"S, 28°04'36"E | Fort Daspoortrand | 25°43′59″S 28°04′36″E / 25.73306°S 28.07667°E |
| Wonderboompoort | 25°41'32"S, 28°11'39"E | Fort Wonderboompoort | 25°41′32″S 28°11′39″E / 25.69222°S 28.19417°E |
After war broke out, three Long Toms were sent to the Natal front and the remaining one sent to Mafeking.
Mafeking

The Long Tom arrived at Mafeking on 23 October 1899. It was hurriedly emplaced on a height called Jackal Tree, about 3,500 yards south of Mafeking on the Geysdorp road. The next day it hurled its first shell into town.[5]:p. 150.On 6 November the Long Tom was moved to a new position, about 3,000 yards east of Cannon Kopje.[5]:p. 155.On 14 February 1900 the Long Tom was moved to the western side of town, but did not remain there for long.[5]:p. 168. On 11 April the Long Tom was sent back to Pretoria, having thrown nearly 1,500 shells into Mafeking.[5]:p. 173.
Ladysmith
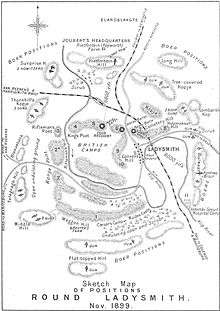
Initially the Boers had two Long Toms. The bombardment commenced on 2 November 1899, with one of the Long Toms firing from Pepworthy Hill.[6]:p. 156. The second Long Tom was emplaced on Bulwana Hill and started firing on 8 November.[6]:p. 158.[7]
On 27 November the Boers brought a third Long Tom and emplaced it on Middle Hill. Two old howitzers were brought up and one had a lucky shot, killing or injuring nine Boer gunners and damaging the Long Tom itself.[6]:p. 163. .[1]:pp. 49–50 The Boers moved the Long Tom on Pepworth Hill to Gun Hill (Lombardskop) on or about 7 December. A couple of nights later the Brits launched a commando attack again this gun, damaged its muzzle with a charge of gun cotton and removed its breach block.[6]:p. 168.
| Emplacement | ±Location (WGS84) | Coords |
|---|---|---|
| Pepworth Hill | 28°30'S, 29°49'E | 28°30′S 29°49′E / 28.500°S 29.817°E |
| Bulwana | 28°35'S, 29°51'E | 28°35′S 29°51′E / 28.583°S 29.850°E |
| Gun Hill | 28°33'S, 29°51'E | 28°33′S 29°51′E / 28.550°S 29.850°E |
| Middle Hill | 28°37'S, 29°45'E | 28°37′S 29°45′E / 28.617°S 29.750°E |
Vaalkrans
One of the Long Toms at Ladysmith was taken forward for use during the Battle of Vaal Krantz. Prior to 5 February 1900 an emplacement had been prepared for it on a hill called "Doringkop"(Thorn Hill). The gun arrived at Vaal Krantz on 5 February, but could not be placed on the hill because one of its wheels had broken and the hill was too steep anyway. The Boers managed to get it to the top that night. It started firing at 05:15 the next morning. British return fire only managed to destroy one of it ammunition wagon, but the setback was temporary.[8]
| Emplacement | Location (WGS84) | Coords |
|---|---|---|
| Doringkop | 28°40'42"S, 29°40'11"E | 28°40′42″S 29°40′11″E / 28.67833°S 29.66972°E |
Kimberley
The Long Tom damaged by the British commandos on 7 December 1899 was taken back to Pretoria for repairs. There the front end of the muzzle was cut off and henceforth the gun was known as the Jew. The breechblock was replaced and it was ready for action. It was then sent to Kimberley, where it was emplaced on a mine dump next to the Kamfers Dam on 6 February 1900.[9]
| Emplacement | Location (WGS84) | Coord |
|---|---|---|
| Kamfers Dam | 28°41'07"S, 24°46'23"E | 28°41′07″S 24°46′23″E / 28.68528°S 24.77306°E |
Diamond Hill
The battle of Diamond Hill took place east of Pretoria in June 1900.There was one Long Tom mounted on a railway truck parked at the Vandermerwe Station[10] It is not known whether it fired a shot.
| Place name | Location (WGS84) | Coords |
|---|---|---|
| Vandermerwe Station | 25°43'28"S, 28°29'43"E | 25°43′28″S 28°29′43″E / 25.72444°S 28.49528°E |
Bergendal
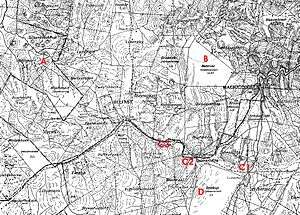
The Battle of Bergendal was the last set piece battle of the war and took place near Belfast, Mpumalanga, in August 1900. It was the only occasion on which all four Long Toms were used in the same battle.
Gun A. Before the battle started this gun was at Dullstroom. It was then moved to a hill south of the farm De Zuikerboschkop,north-west of Belfast.[11] The emplacement has not been found, but should be in the vicinity of 25°37'15"S, 29°56'52"E(WGS84). The cavalry drove it away on 26 August. After the battle it probably escaped to Lydenburg and then into the nearby bushveld.
Gun B. This gun was placed on the farm Waterval on a ridge called Witrant.[12] The location of the emplacement is 25°37' 55"S, 30°09'02"[WGS84]. On 27 August it was moved forward. After the battle it escaped past Helvetia to Lydenburg and from there over the pass to Spitskop, Ohrigstad and eventually to Haenertsburg.[1]:pp.119–128.
Gun C. Initially this gun was mounted on a railway truck. Around 7 August it was moved to the Elandskop vicinity.[12] This emplacement, marked "C1", is situated at 25°46'13"S, 30°12'50"E (WGS84). Before 23 August the gun was moved to a place south-west of Dalmanutha station ("C2")situated at 25°46'14"S, 30°09'05"E [WGS84].[13] Thereafter it was moved to hill 1881 behind the ZARPs (C3) at 25°44'10"S, 30°07'00"E (WGS84) .[12] After the battle it fled past Helvetia to Lydenburg and from there over the pass to Spitskop, Ohrigstad and eventually to Haenertsburg.[1]:pp.119–128.
Gun D. This gun remained on the farm Driekop throughout the battle.[14] The emplacement was found at 25°48'11"S, 30°10'22"E [WGS84]. After the battle it was taken to Komatipoort via Barberton.
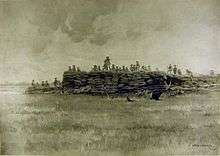
Long Tom Pass
.jpg)
General Buller pursued the Boers and the two Long Toms retreating towards Lydenburg. The town was captured on 6 September 1900. No sooner had it been occupied, than the Boer Long Toms on the mountain pass to Spitskop opened fire on the town.[15]:p. 463On 8 September Buller with 12,000 men and 48 guns started ascending the pass in pursuit of Botha and the Long Toms.[15]:pp.465–6.By 9 September the Long Toms had crossed the crescent of the mountain and stopped just beyond the part of the pass known as the Devil's Knuckles. From there they fired their parting shots at the enemy and disappeared into the mist.[15]:p.468. Today one finds a replica of the Long Tom at this spot and the pass has been named "Long Tom Pass".
| Location | Coord |
|---|---|
| Long Tom replica | 25°09′51″S 30°40′49″E / 25.16417°S 30.68028°E |
Destruction of Long Toms
Komatipoort
The first Long Tom was destroyed on the banks of the Komati River near Komatipoort on 22 September 1900.[1]:p. 116.[16] The exact place is not known. The approximate location is 25°27'09"S,31°56'57"E(WGS84)
| Location | Coord |
|---|---|
| Komati River | 25°27′09″S 31°56′57″E / 25.45250°S 31.94917°E |
Letaba River
The only contemporary written source of the place where the second Long Tom was destroyed,is the diary of one of its gunners, Frederick Rothmann. He wrote that they had been camping at a village called Haenertsburg for a week, when the Long Tom was destroyed on 18 October 1900 and the remains thrown into the Letaba River. He visited the place and took one of its parts as a souvenir.[17] A certain Grobler visited the area in 1954 and somebody who was present when the gun had been destroyed, pointed out the place where it happened. It was next to the Letaba River, about two miles east of Haenertsburg. Another person confirmed the place.[18] Today the placed is covered by the waters of the Ebenezer Dam. The approximate location is 23°56'24"S, 29°57'39"E(WGS84)
| Location | Coord |
|---|---|
| Letaba River | 23°56′24″S 29°57′39″E / 23.94000°S 29.96083°E |
Rietfontein

After the Battle of Bergendal "The Jew" remained hidden until April 1901 during the big sweep against General Viljoen in the Eastern Transvaal. Major-general F.W. Kitchener's column left Lydenburg on 13 April 1901.[19]:p. 140.The Long Tom was emplaced on a hill on the farm Rietfontein. On 16 April it fired a few shells at the advancing British column and then its crew blew the gun up.[20] The remains of the emplacement was found at 24° 57'46"S, 30° 13'16"E (WGS84).
| Location | Coord |
|---|---|
| Rietfontein | 24°57′46″S 30°13′16″E / 24.96278°S 30.22111°E |
Feeskoppie
The fourth Long Tom made its way to Pietersburg (Polokwane today) via Bothasberg, Masepsdrif,and Smitsdorp. Shortly before General Plumer occupied Pietersburg on 8 February 1901, the Long Tom taken in the direction of Haenertsberg. There it was emplaced on a hill called Feeskoppie, some five miles north of Haenertsburg. When Colonel Grenfell approached the area, the crew of the Long Tom fired a few shells at the Brits and then destroyed the gun. The date was 29 April 1901.[19]:p. 438. The location is 23°53'12S, 29°57'36"E(WGS84), close to beacon 85.[1]:p. 134.
| Location | Coord |
|---|---|
| Feeskoppie | 23°53′12″S 29°57′36″E / 23.88667°S 29.96000°E |
See also
Further reading
- Joubert, H, The Long Tom gun emplacements during the battle of Bergendal, Military History Journal, volume 15, No 4
- Lombaard, B.V., Die Longtomkanonne na die slag van Dalmanutha, Scientia Militaria, volume 14, No. 4 https://scientiamilitaria.journals.ac.za
References
- 1 2 3 4 5 6 7 8 9 10 11 12 Changuion, Louis: Silence of the guns, Protea Book House, Pretoria, 2001.
- ↑ Hall, D.D. (1978-06-03). "THE NAVAL GUNS IN NATAL 1899-1902". Military History Journal. The South African Military History Society. 4 (3). ISSN 0026-4016. Retrieved 2009-11-10.
- ↑ Atkins, John Black (1900). "XIII. We attack Vaal Krantz and fail again". The relief of Ladysmith. London: Methuen. p. 263. Retrieved 2009-11-10.
- ↑ Hall, D.D. (1971-12-02). "Guns in South Africa 1899-1902 Part III and IV". Military History Journal. The South African Military History Society. 2 (2). ISSN 0026-4016. Retrieved 2009-11-10.
- 1 2 3 4 Maurice, F & Grant, M.H., History of the War in South Africa 1899 – 1902, London, Hurst & Blackett Ltd, 1908, volume III.
- 1 2 3 4 Amery, L.S. (editor), The Times History of the War in South Africa, Part III, Chapter 7.
- ↑ Breytenbach, J.H., Die Geskiedenis van die Tweede Vryheidsoorlog in Suid-Afrika, 1899-1902, Government Printer, Pretoria, 1969, Part 1, chapter 16.
- ↑ Breytenbach, J.H., Die Geskiedenis van die Tweede Vryheidsoorlog in Suid-Afrika, 1899-1902, Government Printer, Pretoria, 1969, Part 3, chapter 8.
- ↑ Peddle, D.E.: Long Cecil, the gun made in Kimberley during the Siege, Military History Journal, The South African Military History Society, Johannesburg, volume 4, No. 1, June 1977
- ↑ Nel, H.F., Die Slag van Donkerhoek, 11-12 Junie 1900, Scientia Militaria, volume 15, no. 1, p.52 at p. 56.
- ↑ Breytenbach, J.H., Die Geskiedenis van die Tweede Vryheidsoorlog in Suid-Afrika, Pretoria, Government Printer,1996, volume VI., p. 318
- 1 2 3 Reichmann, C & Slocum, S.L’H., Boer War Operations in South Africa 1899 – 1901,Washington,1901 & Scripta Africana, 1987, p. 231.
- ↑ Preller, G.S., Die Vier "Long Toms" Die Huisgenoot, 28 May 1937, pages 14 – 15 and 21.
- ↑ Van Rensburg, T. (editor), Vir Vaderland, Vryheid en Eer. Oorlogsherinneringe van Wilhelm Mangold, 1899 – 1902, Pretoria, Raad vir Geesteswetenskaplike Navorsing, 1988, p. 238.
- 1 2 3 Amery, L.S. (general editor), The Times History of the War in South Africa 1899 – 1902, London, Sampson, Marston and Company, 1906, volume IV.
- ↑ Arthur Conan Doyle, The Great Boer War, Kindle edition, loc. 6158.
- ↑ MER: Oorlogsdagboek van ʼn Transvaalse burger te velde,1899-1900, Tafelberg-uitgewers, 1976, pp. 87—8.
- ↑ Grobler, D.C., Die Long Tom kanonne, Johannesburg, Federasie van Rapportryerskorpse, 1984.
- 1 2 Maurice, F & Grant, M.H., History of the War in South Africa 1899 – 1902, London, Hurst & Blackett Ltd, 1908, volume IV.
- ↑ Colonel M. Jacson, The Record of a Regiment of the Line,Hutchinson & Co, Londen, 1908, also Project Gutenberg, 2005, pp.180—181.
External links
| Wikimedia Commons has media related to 155 mm Creusot Long Tom. |