Japanese battleship Yamato
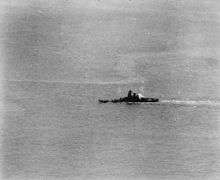
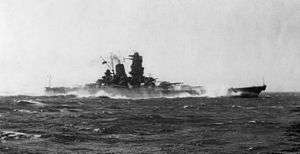 Yamato during sea trials off Japan near Bungo Strait, 20 October 1941. | |
| History | |
|---|---|
| Name: | Yamato |
| Ordered: | March 1937 |
| Builder: | Kure Naval Arsenal |
| Laid down: | 4 November 1937 |
| Launched: | 8 August 1940 |
| Commissioned: | 16 December 1941 |
| Struck: | 31 August 1945 |
| Fate: | Sunk, 7 April 1945 |
| General characteristics (as built) | |
| Class and type: | Yamato-class battleship |
| Displacement: |
|
| Length: |
|
| Beam: | 38.9 m (127 ft 7 in) |
| Draft: | 11 m (36 ft 1 in) |
| Installed power: | |
| Propulsion: | 4 shafts; 4 steam turbines |
| Speed: | 27 knots (50 km/h; 31 mph) |
| Range: | 7,200 nmi (13,300 km; 8,300 mi) at 16 knots (30 km/h; 18 mph) |
| Complement: | 2,500–2,800 |
| Armament: |
|
| Armor: |
|
| Aircraft carried: | 7 Nakajima E8N or Nakajima E4N |
| Aviation facilities: | 2 catapults |
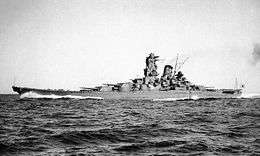
Yamato (大和) was the lead ship of the Yamato class of Imperial Japanese Navy World War II battleships. She and her sister ship, Musashi, were the heaviest battleships ever constructed, displacing 72,800 tonnes at full load and armed with nine 46 cm (18.1 inch) 45 Caliber Type 94 main guns, which were the largest guns ever mounted on a warship. Neither ship survived the war.
Named after the ancient Japanese Yamato Province, Yamato was designed to counter the numerically superior battleship fleet of the United States, Japan's main rival in the Pacific. She was laid down in 1937 and formally commissioned a week after the Pearl Harbor attack in late 1941. Throughout 1942, she served as the flagship of the Japanese Combined Fleet, and in June 1942 Admiral Isoroku Yamamoto directed the fleet from her bridge during the Battle of Midway, a disastrous defeat for Japan. Musashi took over as the Combined Fleet flagship in early 1943, and Yamato spent the rest of the year, and much of 1944, moving between the major Japanese naval bases of Truk and Kure in response to American threats. Although present at the Battle of the Philippine Sea in June 1944, she played no part in the battle.
The only time Yamato fired her main guns at enemy surface targets was in October 1944, when she was sent to engage American forces invading the Philippines during the Battle of Leyte Gulf. On the verge of success, the Japanese force turned back, believing they were engaging an entire US carrier fleet rather than the light escort carrier group that was all that stood between the battleship and the vulnerable troop transports.
During 1944, the balance of naval power in the Pacific decisively turned against Japan, and by early 1945, its fleet was much depleted and badly hobbled by critical fuel shortages in the home islands. In a desperate attempt to slow the Allied advance, Yamato was dispatched on a one-way mission to Okinawa in April 1945, with orders to beach herself and fight until destroyed protecting the island. The task force was spotted south of Kyushu by US submarines and aircraft, and on 7 April 1945 she was sunk by American carrier-based bombers and torpedo bombers with the loss of most of her crew.
Design and construction
During the 1930s the Japanese government adopted an ultranationalist militancy with a view to greatly expand the Japanese Empire.[1] Japan withdrew from the League of Nations in 1934, renouncing its treaty obligations.[2] After withdrawing from the Washington Naval Treaty, which limited the size and power of capital ships, the Imperial Japanese Navy began their design of the new Yamato class of heavy battleships. Their planners recognized Japan would be unable to compete with the output of U.S. naval shipyards should war break out, so the 70,000 ton[3] vessels of the Yamato class were designed to be capable of engaging multiple enemy battleships at the same time.[4][5]
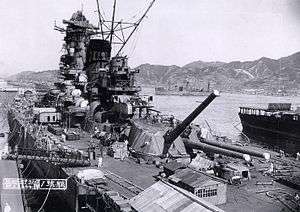
The keel of Yamato, the lead ship of the class,[6] was laid down at the Kure Naval Arsenal, Hiroshima, on 4 November 1937, in a dockyard that had to be adapted to accommodate her enormous hull.[7][8] The dock was deepened by one meter, and gantry cranes capable of lifting up to 350 tonnes were installed.[7][9] Extreme secrecy was maintained throughout construction,[7][10] a canopy even being erected over part of the drydock to screen the ship from view.[11] Yamato was launched on 8 August 1940, with Captain (later Vice-Admiral) Miyazato Shutoku in command.[12] A great effort was made in Japan to ensure that the ships were built in extreme secrecy to prevent American intelligence officials from learning of their existence and specifications.[7][10]
Armament
Yamato's main battery consisted of nine 46 cm (18.1 in) 45 Caliber Type 94 naval guns—the largest caliber of naval artillery ever fitted to a warship,[14] although the shells were not as heavy as those fired by the British 18-inch naval guns of World War I. Each gun was 21.13 metres (69.3 ft) long, weighed 147.3 tonnes (162.4 short tons), and was capable of firing high-explosive or armor-piercing shells 42 kilometres (26 mi).[15] Her secondary battery comprised twelve 155-millimetre (6.1 in) guns mounted in four triple turrets (one forward, one aft, two midships), and twelve 127-millimetre (5.0 in) guns in six twin mounts (three on each side amidships). These turrets had been taken off the Mogami-class cruisers when those vessels were converted to a main armament of 20.3-centimetre (8.0 in) guns. In addition, Yamato carried twenty-four 25-millimetre (0.98 in) anti-aircraft guns, primarily mounted amidships.[14] When refitted in 1944 and 1945 for naval engagements in the South Pacific,[16] the secondary battery configuration was changed to six 155 mm guns and twenty-four 127 mm guns, and the number of 25 mm anti-aircraft guns was increased to 162.[17]
Service
Trials and initial operations
During October or November 1941 Yamato underwent sea trials, reaching her maximum possible speed of 27.4 knots (50.7 km/h; 31.5 mph).[12][N 1] As war loomed, priority was given to accelerating military construction. On 16 December, months ahead of schedule, the battleship was formally commissioned at Kure, in a ceremony more austere than usual, as the Japanese were still intent on concealing the ship's characteristics.[12] The same day, under Captain (later Vice-Admiral) Gihachi Takayanagi, she joined fellow battleships Nagato and Mutsu in the 1st Battleship Division.[19]
On 12 February 1942, Yamato became the flagship of Admiral Isoroku Yamamoto's Combined Fleet.[12][18] A veteran of Japan's crushing victory over Russia at the Battle of Tsushima in the Russo-Japanese War, the Pearl Harbor victor was planning a decisive engagement with the United States Navy at Midway Island. After participating in war games Yamato departed Hiroshima Bay on 27 May for duty with Yamamoto's main battleship group.[12][20] US codebreakers were aware of Yamamoto's intentions and the Battle of Midway proved disastrous for Japan's carrier force, with four fleet carriers and 332 aircraft destroyed.[12] Yamamoto exercised overall command from Yamato's bridge,[20] but his battleplan had widely dispersed his forces to lure the Americans into a trap, and the battleship group was too far away to take part in the engagement.[12] On 5 June, Yamamoto ordered the remaining ships to return to Japan, so Yamato withdrew with the main battleship force to Hashirajima before making her way back to Kure.[18][19]
Yamato left Kure for Truk on 17 August 1942.[21][N 2] After 11 days at sea, she was sighted by the American submarine USS Flying Fish, which fired four torpedoes (all of which missed); Yamato arrived safely at Truk later that day.[18][21][N 3] She remained there throughout the Guadalcanal Campaign because of a lack of 460 mm ammunition suitable for shore bombardment, uncharted seas around Guadalcanal, and her high fuel consumption.[12][16] Before the year's end, Captain (later Rear Admiral) Chiaki Matsuda was assigned to command Yamato.[21]
On 11 February 1943, Yamato was replaced by her sister ship Musashi as flagship of the Combined Fleet.[12] The battleship spent only a single day away from Truk between her arrival in August 1942 and her departure on 8 May 1943.[12][22] On that day, she set sail for Yokosuka and from there for Kure, arriving on 14 May.[12][22] She spent nine days in dry dock for inspection and general repairs,[21] and after sailing to Japan's western Inland Sea she was again dry-docked in late July for significant refitting and upgrades. On 16 August, Yamato began her return to Truk, where she joined a large task force formed in response to American raids on the Tarawa and Makin atolls.[21] She sortied in late September with Nagato, three carriers, and smaller warships to intercept US Task Force 15, and again a month later with six battleships, three carriers, and eleven cruisers. Intelligence had reported that the United States Naval Base at Pearl Harbor was nearly empty of ships,[12] which the Japanese interpreted to mean that an American naval force would strike at Wake Island.[12] But there were no radar contacts for six days, and the fleet returned to Truk, arriving on 26 October.[12]
Yamato escorted Transport Operation BO-1 from Truk to Yokosuka during 12–17 December.[22] Subsequently, because of their extensive storage capacity and thick armor protection, Yamato and Musashi were pressed into service as transport vessels.[23] On 25 December, while ferrying troops and equipment—which were wanted as reinforcements for the garrisons at Kavieng and the Admiralty Islands—from Yokosuka to Truk, Yamato and her task group were intercepted by the American submarine Skate about 180 miles (290 km) out at sea.[12][24] Skate fired a spread of four torpedoes at Yamato; one struck the battleship's starboard side toward the stern.[12] A hole 5 metres (16 ft) below the top of her anti-torpedo bulge and measuring some 25 metres (82 ft) across was ripped open in the hull, and a joint between the upper and lower armored belts failed, causing the rear turret's upper magazine to flood.[13] Yamato took on about 3,000 tons of water,[13][24] but reached Truk later that day. The repair ship Akashi effected temporary repairs on the battleship,[21] and Yamato departed on 10 January for Kure.[24]
On 16 January 1944, Yamato arrived at Kure for repairs of the torpedo damage and was dry-docked until 3 February.[21] During this time, armor plate sloped at 45° was fitted in the area of damage to her hull. It had been proposed that 5,000 long tons (5,100 t) of steel be used to bolster the ship's defense against flooding from torpedo hits outside the armored citadel, but this was rejected out of hand because the additional weight would have increased Yamato's displacement and draft by too much.[13] While Yamato was dry-docked, Captain Nobuei Morishita—former captain of the battleship Haruna—assumed command.[21] On 25 February, Yamato and Musashi were reassigned from the 1st Battleship Division to the Second Fleet.
Yamato was again dry-docked at Kure for further upgrades to all her radar and anti-aircraft systems from 25 February to 18 March 1944.[21] Each of the two beam-mounted 6.1 inch (155-mm) triple turrets was removed and replaced by three pairs of 5-inch (127-mm) AA guns in double mounts. In addition, 8 triple and 26 single 25mm AA mounts were added at this time, increasing the total number of 127 mm and 25 mm anti-aircraft guns to 24 and 162, respectively.[17] Shelters were also added on the upper deck for the increased AA crews. A Type 13 air search and Type 22, Mod 4, surface search/gunnery control radar were installed and the main mast was altered. Her radar suite was also upgraded to include infrared identification systems and aircraft search and gunnery control radars.[21] She left the dry dock on 18 March and went through several trials beginning on 11 April.[24] Yamato left Kure on 21 April and embarked soldiers and materiel the following day at Okinoshima for a mission to Manila, reaching the Philippines on 28 April.[13] She then moved on to Malaya to join Vice-Admiral Jisaburo Ozawa's Mobile Fleet at Lingga;[21] this force arrived at Tawi Tawi on 14 May.[21]
Battle of the Philippine Sea
In early June, Yamato and Musashi were again requisitioned as troop transports, this time to reinforce the garrison and naval defenses of the island of Biak as part of Operation Kon.[23][25] The mission was cancelled when word reached Ozawa's headquarters of American carrier attacks on the Mariana Islands.[23] Instead, the Imperial Japanese Navy reorganized, concentrating the majority of its remaining fighting strength in the hope of achieving a decisive success against the Americans. By this time though, the entire Japanese navy was inferior in numbers and experience to the U.S. Pacific Fleet.[25] From 19 to 23 June 1944, Yamato escorted forces of Ozawa's Mobile Fleet during the Battle of the Philippine Sea, dubbed by American pilots "The Great Marianas Turkey Shoot".[25][26] The Japanese lost three aircraft carriers and 426 aircraft;[25] Yamato's only significant contribution was mistakenly opening fire on returning Japanese aircraft.[21]
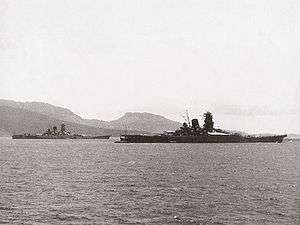
Following the battle, Yamato withdrew with the Mobile Fleet to the Hashirajima staging area near Kure to refuel and rearm. With Musashi she left the fleet on 24 June for the short journey to Kure, where she received five more triple 25 mm anti-aircraft mounts.[25] The opportunity was taken to put in place "emergency buoyancy keeping procedures". These resulted in the removal of almost every flammable item from the battleship, including linoleum, bedding, and mattresses. In place of the latter, men slept on planks which could be used to repair damage. Flammable paints received a new silicon based overcoat, and additional portable pumps and fire fighting apparatus were installed.[25] Leaving Japan on 8 July, Yamato—accompanied by the battleships Musashi, Kongō, Nagato, and eleven cruisers and destroyers—sailed south. Yamato and Musashi headed for the Lingga Islands, arriving on 16–17 July. By this stage of the war, Japan's tanker fleet had been much reduced by marauding American submarines, so major fleet units were stationed in the East Indies to be near the source of their fuel supply.[25] The battleships remained at the islands for the next three months.[25]
Battle of Leyte Gulf
Between 22 and 25 October 1944, as part of Admiral Takeo Kurita's Center Force (also known as Force A or First Striking Force), Yamato took part in one of the largest naval engagements in history—the Battle of Leyte Gulf.[27] In response to the American invasion of the Philippines, Operation Shō-Gō called for a number of Japanese groups to converge on the island of Leyte, where American troops were landing. On 18 October, Yamato was given a coating of black camouflage in preparation for her nighttime transit of the San Bernardino Strait; the main ingredient was soot taken from her smokestack.[21] While en route to Leyte, the force was attacked in Palawan Passage on 23 October by the submarines USS Darter and Dace, which sank two Takao-class heavy cruisers including Kurita's flagship, Atago, and damaged a third.[28] Kurita survived the loss of Atago and transferred his flag to Yamato.[21]
Battle of the Sibuyan Sea
The following day the Battle of the Sibuyan Sea hurt the Center Force badly with the loss of three more heavy cruisers, eliminating a substantial part of the fleet's anti-aircraft defence. During the course of the day, American carrier aircraft sortied a total of 259 times. Aircraft from the USS Essex struck Yamato with two armor-piercing bombs and scored one near miss; Yamato suffered moderate damage and took on about 3,370 tonnes (3,320 long tons) of water, but remained battleworthy.[29] However, her sister ship Musashi became the focus of the American attacks and eventually sank after being hit with 17 bombs and 19 torpedoes.[30]
Battle off Samar
Unknown to the Japanese admiral, the main American defensive force with Admiral William Halsey, Jr. departed Leyte on the evening of 24 October. Convinced that Kurita's Center Force had been turned back, Halsey took his powerful 3rd Fleet in pursuit of the Japanese Northern Force, a decoy group composed of one fleet aircraft carrier (Zuikaku), three light carriers, two Ise-class hybrid battleship-carriers, and their escorts.[28] The deception was a success, drawing away five fleet carriers and five light carriers with more than 600 aircraft among them, six fast battleships, eight cruisers, and over 40 destroyers. During the hours of darkness, Kurita's force navigated the San Bernardino Strait and shortly after dawn, in the Battle off Samar, attacked an American formation that had remained in the area to provide close support for the invading troops. Known as "Taffy 3", this small group comprised six escort carriers, three destroyers, and four destroyer escorts.[31] In the initial stages of this battle, Yamato engaged enemy surface targets for the only time in her career, hitting several American ships.[31][32][33] After Yamato confirmed primary battery hits on the escort carrier USS Gambier Bay, a spread of torpedoes heading for Yamato was spotted; the battleship was forced to steer away from the fighting to avoid them and was unable to rejoin the battle.[28] Although armed only with torpedoes and 5 inch guns and under attack by large caliber cannons, the light American surface combatants, supported by FM-2 Wildcats and TBM Avengers from Taffy 3's escort carriers,[34] attacked so ferociously that Kurita believed his ships were engaging a full American task force of fleet carriers.[28] A mistaken report that he was facing six fleet carriers, three cruisers, and two destroyers led Kurita to order his task force to turn and disengage. Yamato emerged from the battle without serious damage; only three near misses from bombs and seventeen casualties from strafing were suffered during the battle itself, while carrier strikes during the retreat caused light damage to the ship and injured or killed 21 crewmen. Three more heavy cruisers and one light cruiser were subsequently lost. The Centre Force sank one American escort carrier (CVE), two destroyers, and a destroyer escort.[28] A second CVE was lost by kamikaze attack after the surface engagement.
Following the engagement, Yamato and the remnants of Kurita's force returned to Brunei.[35] On 15 November 1944, the 1st Battleship Division was disbanded and Yamato became the flagship of the Second Fleet.[21] On 21 November, while transiting the East China Sea in a withdrawal to Kure Naval Base,[36] Yamato's battle group was attacked by the submarine USS Sealion. The battleship Kongō and destroyer Urakaze were lost.[37] Yamato was immediately drydocked for repairs and anti-aircraft upgrades on reaching Kure, where several of the battleship's older anti-aircraft guns were replaced. On 25 November, Captain Aruga Kōsaku was named Yamato's commander.[21]
Operation Ten-Go

On 1 January 1945, Yamato, Haruna and Nagato were transferred to the newly reactivated 1st Battleship Division. Yamato left drydock two days later for Japan's Inland Sea.[21] This reassignment was brief; the 1st Battleship Division was deactivated once again on 10 February and Yamato was allotted to the 1st Carrier Division.[38] On 19 March, American carrier aircraft from Enterprise, Yorktown and Intrepid raided Kure.[38][39] Although 16 warships were hit, Yamato sustained only minor damage from a number of near misses and from one bomb that struck her bridge.[32] The intervention of a squadron of Kawanishi N1K1 "Shiden" fighters (named "George" by the Allies) flown by veteran Japanese fighter instructors prevented the raid from doing too much damage to the base and assembled ships,[39][N 4] while Yamato's ability to maneuver—albeit slowly—in the Nasami Channel benefited her.[32]
As the final step before their planned invasion of the Japanese mainland, Allied forces invaded Okinawa on 1 April.[40] The Imperial Japanese Navy's response was to organise a mission codenamed Operation Ten-Go that would see the commitment of much of Japan's remaining surface strength. Yamato and nine escorts (the cruiser Yahagi and eight destroyers) would sail to Okinawa and, in concert with kamikaze and Okinawa-based army units, attack the Allied forces assembled on and around Okinawa. Yamato would then be beached to act as an unsinkable gun emplacement and continue to fight until destroyed.[41][42] In preparation for the mission, Yamato had taken on a full stock of ammunition on 29 March.[21] According to the Japanese plan, the ships were supposed to take aboard only enough fuel for a one way voyage to Okinawa, but additional fuel amounting to 60 percent of capacity was issued on the authority of local base commanders. Designated the "Surface Special Attack Force", the ships left Tokuyama at 15:20 on 6 April.[41][42]
Unfortunately for the Japanese, the Allies had intercepted and decoded their radio transmissions, learning the particulars of Operation Ten-Go. Further confirmation of Japanese intentions came around 20:00 when the Surface Special Attack Force, navigating the Bungo Strait, was spotted by the American submarines Threadfin and Hackleback. Both reported Yamato's position to the main American carrier strike force,[16][42] but neither could attack because of the speed of the Japanese ships—22 knots (25 mph; 41 km/h)—and their extreme zigzagging.[42]
The Allied forces around Okinawa began to brace for an assault. Admiral Raymond Spruance ordered six battleships already engaged in shore bombardment in the sector to prepare for surface action against Yamato. These orders were countermanded in favor of strikes from Admiral Marc Mitscher's aircraft carriers, but as a contingency the battleships together with seven cruisers and 21 destroyers were sent to interdict the Japanese force before it could reach the vulnerable transports and landing craft.[42][N 5]
Yamato's crew were at general quarters and ready for anti-aircraft action by dawn on 7 April. The first Allied aircraft made contact with the Surface Special Attack Force at 08:23; two flying boats arrived soon thereafter, and for the next five hours, Yamato fired Common Type 3 or Beehive (3 Shiki tsûjôdan) shells at the Allied seaplanes, but could not prevent them from shadowing the force. Yamato obtained her first radar contact with aircraft at 10:00; an hour later, American F6F Hellcat fighters appeared overhead to deal with any Japanese aircraft that might appear. None did.[43][N 6]
At about 12:30, 280 bomber and torpedo bomber aircraft arrived over the Japanese force. Asashimo, which had earlier fallen out of formation due to engine trouble, was caught and sunk by a detachment of aircraft from San Jacinto. The Surface Special Attack Force increased speed to 24 knots (28 mph; 44 km/h), and following standard Japanese anti-aircraft defensive measures, the destroyers began circling Yamato. The first aircraft swooped in to attack at 12:37. Yahagi turned and raced away at 35 knots (40 mph; 65 km/h) in an attempt to draw off some of the attackers; it drew off only an insignificant number. Yamato was not hit for four minutes, but at 12:41 two bombs obliterated two of her triple 25 mm anti-aircraft mounts and blew a hole in the deck. A third bomb then destroyed her radar room and the starboard aft 127 mm mount. At 12:46, another two bombs struck the battleship's port side, one slightly ahead of the aft 155 mm centreline turret and the other right on top of the gun. These caused a great deal of damage to the turret and its magazines; only one man survived.[43][N 7] At 12:45 a single torpedo struck Yamato far forward on her port side, sending extreme shocks throughout the ship. Because many of the ship's survivors were later killed by strafing or were trapped when Yamato sank, the details are uncertain, but authors Garzke and Dulin record that little damage was caused.[43] Shortly afterward, up to three more torpedoes struck Yamato. Two impacts, on the port side near the engine room and on one of the boiler rooms, are confirmed; the third is disputed but is regarded by Garzke and Dulin as probable because it would explain the reported flooding in Yamato's auxiliary steering room. The attack ended around 12:47, leaving the battleship listing 5–6° to port; counterflooding—deliberately flooding compartments on the other side of the ship—reduced the list to 1°. One boiler room had been disabled, slightly reducing Yamato's top speed, and strafing had incapacitated many of the gun crews who manned Yamato's unprotected 25 mm anti-aircraft weapons, sharply curtailing their effectiveness.[43]
The second attack started just before 13:00. In a coordinated strike, dive bombers flew high overhead to begin their runs while torpedo bombers approached from all directions at just above sea level. Overwhelmed by the number of targets, the battleship's anti-aircraft guns were less than effective, and the Japanese tried desperate measures to break up the attack. Yamato's main guns were loaded with Beehive shells fused to explode one second after firing—a mere 1,000 m (3,300 ft) from the ship—but this had little effect. Three or four torpedoes struck the battleship on the port side, and one to starboard. Three hits, close together on the port side, are confirmed: one struck a fireroom that had been hit earlier, one impacted a different fireroom, and the third hit the hull adjacent to a previously damaged outboard engine room, increasing the water that had already been flowing into that space and possibly causing flooding in nearby locations. The fourth, unconfirmed, hit may have struck aft of the third; Garzke and Dulin believe this would explain the rapid flooding that reportedly occurred in that location.[44] This attack left Yamato in a perilous position, listing 15–18° to port. Counterflooding all of the remaining starboard void spaces lessened this to 10°, but further correction would have required either repairs or flooding the starboard engine and fire rooms. Although the battleship was in no danger of sinking at this point, the list meant that the main battery was unable to fire and her maximum speed was limited to 18 knots (33 km/h; 21 mph).[45]
The third and most damaging attack developed at about 13:40. At least four bombs hit the ship's superstructure and caused heavy casualties among her 25 mm anti-aircraft gun crews. Many near misses drove in her outer plating, partially compromising her defense against torpedoes. Most serious were four more torpedo impacts. Three exploded on the port side, increasing water intake into the port inner engine room and flooding yet another fireroom and the steering gear room. With the auxiliary steering room already underwater, the ship lost all maneuverability and became stuck in a starboard turn. The fourth torpedo most likely hit the starboard outer engine room which, along with three other rooms on the starboard side, was in the process of being counterflooded to reduce the port list. The torpedo strike greatly increased the rate of water intake, trapping many crewmen before they could escape.[46]
At 14:02, the order was belatedly given to abandon ship. By this time, Yamato's speed had dropped to 10 knots (19 km/h; 12 mph) and her list was steadily increasing. Fires were raging out of control in some sections of the ship and alarms had begun to sound on the bridge warning of critical temperatures in the forward main battery magazines.[N 8] Normal practice would have been to flood the magazines, preventing any explosion, but the pumping stations that should have performed this task had been rendered unusable by previous flooding.[48]
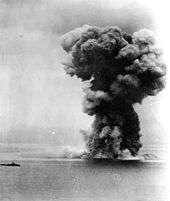
At 14:05, Yahagi sank, the victim of twelve bombs and seven torpedoes. At the same time, a final flight of torpedo bombers attacked Yamato from her starboard side. Her list was now such that the torpedoes—set to a depth of 6.1 m (20 ft)—struck the bottom of her hull. The battleship continued her inexorable roll to port.[21] By 14:20, the power went out and her remaining 25 mm anti-aircraft guns began to drop into the sea. Three minutes later, Yamato capsized. Her main 46 cm turrets fell off, and as she rolled suction was created that drew swimming crewmen back toward the ship. When the roll reached approximately 120°, one of the two bow magazines detonated in a tremendous explosion.[48] The resulting mushroom cloud—over 6 kilometres (3.7 mi) high—was seen 160 kilometres (99 mi) away on Kyūshū.[49] Yamato sank rapidly, losing an estimated 3,055 of her 3,332 crew, including fleet commander Vice-Admiral Seiichi Itō.[21][N 9] The few survivors were recovered by the four surviving destroyers, which withdrew to Japan.[21]
From the first attack at 12:37 to the explosion at 14:23, Yamato was hit by at least 11 torpedoes and six bombs. There may have been two more torpedo and bomb hits, but this is not confirmed.[48][50]
Wreck discovery
Because of the often confused circumstances and incomplete information regarding their sinkings, few wrecks of Japanese capital ships have been discovered and identified.[47] Drawing on US wartime records, an expedition to the East China Sea in 1982 produced some results, but the wreckage discovered could not be clearly identified.[51] A second expedition returned to the site two years later, and the team's photographic and video records were later confirmed by one of the battleship's designers, Shigeru Makino, to show the Yamato's last resting place. The wreck lies 290 kilometres (180 mi) southwest of Kyushu under 340 metres (1,120 ft) of water in two main pieces; a bow section comprising the front two thirds of the ship, and a separate stern section.[51]
On 16 July 2015, a group of Liberal Democratic Party lawmakers began meetings to study the feasibility of raising the ship from the ocean floor and recovering the remains of crewmembers entombed in the wreckage. The group said that it plans to request government funds to research the technical feasibility of recovering the ship.[52]
In May 2016, the wreckage was surveyed using digital technology, giving a more detailed view and confirming the earlier identification. The resulting video revealed many details such as the chrysanthemum crest on the bow, the massive propeller, and the detached main gun turret. The nine-minute video of this survey is being shown at the Yamato Museum in Kure.[53][54]
Cultural significance
From the time of their construction, Yamato and her sister Musashi carried significant weight in Japanese culture. The battleships represented the epitome of Imperial Japanese naval engineering, and because of their size, speed, and power, visibly embodied Japan's determination and readiness to defend its interests against the Western Powers and the United States in particular. Shigeru Fukudome, chief of the Operations Section of the Imperial Japanese Navy General Staff, described the ships as "symbols of naval power that provided to officers and men alike a profound sense of confidence in their navy."[55] Yamato's symbolic might was such that some Japanese citizens held the belief that their country could never fall as long as the ship was able to fight.[56]
Decades after the war, Yamato was memorialised in various forms by the Japanese. Historically, the word "Yamato" was used as a poetic name for Japan; thus, her name became a metaphor for the end of the Japanese empire.[57][58] In April 1968, a memorial tower was erected on Cape Inutabu in Japan's Kagoshima Prefecture to commemorate the lives lost in Operation Ten-Go. In October 1974, Leiji Matsumoto created a new television series, Space Battleship Yamato, about rebuilding the battleship as a starship and its interstellar quest to save Earth. The series was a huge success, spawning five feature films and two more TV series; as post-war Japanese tried to redefine the purpose of their lives, Yamato became a symbol of heroism and of their desire to regain a sense of masculinity after their country's defeat in the war.[59][60] Brought to the United States as Star Blazers, the animated series proved popular and established a foundation for anime in the North American entertainment market.[61] The motif in Space Battleship Yamato was repeated in Silent Service, a popular manga and anime that explores issues of nuclear weapons and the Japan-US relationship. The crew of the main plot device, a nuclear-powered super submarine, mutinied and renamed their vessel Yamato, in allusion to the World War II battleship and the ideals she symbolises.[62]
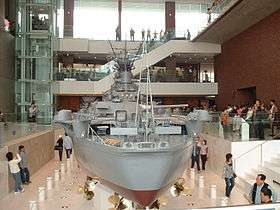
In 2005, the Yamato Museum was opened near the site of the former Kure shipyards. Although intended to educate on the maritime history of post Meiji-era Japan,[63] the museum gives special attention to its namesake; the battleship is a common theme among several of its exhibits, which includes a section dedicated to Matsumoto's animated series.[64] The centrepiece of the museum, occupying a large section of the first floor, is a 26.3-metre (86 ft) long model of Yamato (1:10 scale).[65]
Later that year, Toei released a 143-minute movie, Yamato, based on a book by Jun Henmi, to commemorate the 60th anniversary of the end of World War II; Tamiya released special editions of scale models of the battleship in conjunction with the film's release.[66] Based on a book of the same name, the film is a tale about the sailors aboard the doomed battleship and the concepts of honour and duty. The film was shown on more than 290 screens across the country and was a commercial success, taking in a record 5.11 billion yen at the domestic box office.[67][68]
See also
- Battleships in World War II
- Bismarck-class battleship
- King George V-class battleship (1939)
- Iowa-class battleship
- Littorio-class battleship
- Richelieu-class battleship
Notes
Footnotes
- ↑ Garzke/Dulin and Whitley's books do not give specific dates, and disagree on the month; the former gives October, and the latter gives November.[12][18]
- ↑ Whitley says that Yamato left six days earlier (the 11th).[18]
- ↑ Garzke and Dulin report that Yamato entered Truk on the 29th.[12]
- ↑ Led by the man who planned the attack on Pearl Harbor, Minoru Genda, the appearance of these fighters, which were equal or superior in performance to the F6F Hellcat, surprised the attackers and several American planes were shot down.[39]
- ↑ Authors Garzke and Dulin speculate that the likely outcome of a battle between the two forces would have been a victory for the Allies, but at a serious cost due to the large margin of superiority Yamato held over the old battleships in firepower (460 mm vs. 356 mm), armor and speed (27 knots (50 km/h; 31 mph) vs. 21 knots (39 km/h; 24 mph)).[42]
- ↑ The poor quality of the Japanese naval radar during World War II meant that only large groups of planes could be detected. Smaller detachments were usually picked up via line of sight.
- ↑ This account is based on Garzke and Dulin's Battleships: Axis and Neutral Battleships in World War II. Other works generally agree, although the exact timings of events can vary between sources.[12]
- ↑ Garzke and Dulin state in their 1985 account that the alarms were for the aft magazines. Yamato's wreck was discovered that same year and more detailed surveys were completed in 1999; these conclude that it was the fore magazines that exploded. Corroborating evidence comes from Yamato's Executive Officer, Nomura Jiro, who testified that he saw warning lights for the forward magazines.[47]
- ↑ Garzke and Dulin give a slightly different number of 3,063 out of 3,332 lost. An exact number is unknown.
Citations
- ↑ Willmott (2000), p. 32.
- ↑ Garzke and Dulin (1985), p. 44.
- ↑ Jackson (2000), p. 74; Jentshura, Jung and Mickel (1977), p. 38.
- ↑ Johnston and McAuley (2000), p. 122.
- ↑ Willmott (2000), p. 35. The Japanese Empire produced 3.5% of the world's industrial output, while the United States produced 35%.
- ↑ Skulski (2004), pp. 8–11.
- 1 2 3 4 Johnston and McAuley (2000), p. 123.
- ↑ Garzke and Dulin (1985), pp. 52–54.
- ↑ Garzke and Dulin (1985), p. 53.
- 1 2 Hough, p. 205
- ↑ Garzke and Dulin (1985), pp. 50–51.
- 1 2 3 4 5 6 7 8 9 10 11 12 13 14 15 16 17 18 19 Garzke and Dulin (1985), p. 54.
- 1 2 3 4 5 Garzke and Dulin (1985), p. 55.
- 1 2 Jackson (2000), p. 75.
- ↑ Johnston and McAuley (2000), p. 123. Because of the size of the guns and thickness of armor, each of the three main turrets weighed more than a good sized destroyer.
- 1 2 3 Jackson (2000), p. 128.
- 1 2 Johnston and McAuley (2000), p. 180.
- 1 2 3 4 5 Whitley (1998), p. 211.
- 1 2 Skulski (2004), p. 10.
- 1 2 Ballard (1999), p. 36.
- 1 2 3 4 5 6 7 8 9 10 11 12 13 14 15 16 17 18 19 20 21 22 "Combined Fleet – tabular history of Yamato". Parshall, Jon; Bob Hackett, Sander Kingsepp, & Allyn Nevitt. 2009. Retrieved 1 April 2010.
- 1 2 3 Whitley (1998), p. 212.
- 1 2 3 Steinberg (1978), p. 147.
- 1 2 3 4 Whitley (1998), p. 213.
- 1 2 3 4 5 6 7 8 Garzke and Dulin (1985), p. 56.
- ↑ Reynolds (1982), p. 139.
- ↑ Reynolds (1982), p. 152.
- 1 2 3 4 5 Garzke and Dulin (1985), p. 57.
- ↑ Garzke and Dulin (1985), p. 58.
- ↑ Skulski (2004), p. 11.
- 1 2 Reynolds (1982), p. 156.
- 1 2 3 Garzke and Dulin (1985), p. 59.
- ↑ "Yamato (Battleship, 1941–1945) — in the Battle of Leyte Gulf, 22–26 October 1944". Japanese Navy Ships. Naval Historical Center, Department of the Navy. 13 May 2000. Retrieved 7 March 2009.
- ↑ Steinberg (1980), p. 60
- ↑ Steinberg (1980), p. 63.
- ↑ Wheeler (1980), p. 183.
- ↑ Jackson (2000), p. 129.
- 1 2 Reynolds (1982), p. 160.
- 1 2 3 Reynolds (1968), p. 338.
- ↑ Feifer (2001), p. 7.
- 1 2 Reynolds (1982), p. 166.
- 1 2 3 4 5 6 Garzke and Dulin (1985), p. 60.
- 1 2 3 4 Garzke and Dulin (1985), pp. 60–61.
- ↑ Garzke and Dulin (1985), pp. 62–63.
- ↑ Garzke and Dulin (1985), p. 63.
- ↑ Garzke and Dulin (1985), pp. 64–65.
- 1 2 Tully, Anthony (4 September 2009). "Located/Surveyed Shipwrecks of the Imperial Japanese Navy". Mysteries/Untold Sagas of the Imperial Japanese Navy. Retrieved 23 January 2010.
- 1 2 3 Garzke and Dulin (1985), p. 65.
- ↑ Reynolds (1982), p. 169.
- ↑ Whitley (1998), p. 216.
- 1 2 "Remains of sunken Japanese battleship Yamato discovered". Reading Eagle. Associated Press. 4 August 1985. Retrieved 31 March 2010.
- ↑ Jiji, "LDP lawmakers aim to raise battleship Yamato wreckage", Japan Times, 29 July 2015
- ↑ Yohei Izumida (May 8, 2016). "Kure to embark on underwater survey of mighty Yamato warship". Asahi Shimbun. Retrieved August 22, 2016.
- ↑ Yohei Izumida (July 17, 2016). "New footage of sunken Yamato given to media before showing". Asahi Shimbun. Retrieved August 22, 2016.
- ↑ Evans and Peattie (1997), pp. 298, 378.
- ↑ "A bomb survivors leery of battleship hype". Yomiuri Shimbun. 6 August 2006.
- ↑ Yoshida and Minear (1985), p. xvii; Evans and Peattie (1997), p. 378.
- ↑ Skulski (2004), p. 7.
- ↑ Mizuno (2007), pp. 106, 110–111, 121–122.
- ↑ Levi (1998), p. 72.
- ↑ Wright (2009), p. 99.
- ↑ Mizuno (2007), pp. 114–115.
- ↑ "Outline". Hiroshima, Japan: Yamato Museum. 2008. Retrieved 29 March 2010.
- ↑ "Yamato Museum Leaflet" (PDF). Hiroshima, Japan: Yamato Museum. 2005. Retrieved 2 April 2010.
- ↑ "Yamato—Kure Maritime Museum Leaflet" (PDF). Hiroshima, Japan: Yamato Museum. 2008. Retrieved 2 April 2010.
- ↑ "戦艦大和・映画「男たちの大和/YAMATO」特別仕様" [Battleship Yamato—Special Edition for Yamato the Movie] (in Japanese). Tamiya Corporation. 14 December 2005. Retrieved 28 March 2010.
- ↑ "「One piece」が爆発的ヒット、「男たちの大和」「相棒」を超えた背景とは..." [One Piece is a Runaway Hit, Could It Surpass Yamato and Aibou...]. Hollywood Channel (in Japanese). Japan: Broadmedia. 13 December 2009. Retrieved 27 March 2010.
- ↑ 「相棒」50億円超えちゃう大ヒットの予感?水谷と寺脇が初日にノリノリで登場! [Seems Aibou Will be a 5 Billion Yen Big Hit? Mizutani and Terawaki Makes an Entrance on Opening Day in High Spirits!]. CinemaToday (in Japanese). Japan: Welva. 1 May 2008. Retrieved 27 March 2010.
References
- Ballard, Robert (1999). Return to Midway. London. Wellington House. ISBN 978-0-304-35252-4
- Cox, Robert Jon (2010). The Battle Off Samar: Taffy III at Leyte Gulf (5th ed.). Agogeebic Press. ISBN 978-0-9822390-4-9.
- Evans, David C.; Peattie, Mark R. (1997). Kaigun: Strategy, Tactics, and Technology in the Imperial Japanese Navy, 1887–1941. Annapolis, Maryland: Naval Institute Press. ISBN 978-0-87021-192-8. OCLC 36621876.
- Feifer, George (2001). "Operation Heaven Number One". The Battle of Okinawa: The Blood and the Bomb. The Lyons Press. ISBN 978-1-58574-215-8.
- Garzke, William H.; Dulin, Robert O. (1985). Battleships: Axis and Neutral Battleships in World War II. Annapolis, Maryland: Naval Institute Press. ISBN 978-0-87021-101-0. OCLC 12613723.
- Jackson, Robert (2000). The World's Great Battleships. Brown Books. ISBN 978-1-897884-60-7.
- Jentschura, Hansgeorg; Jung, Dieter; Mickel, Peter (1977). Warships of the Imperial Japanese Navy, 1869–1945. Annapolis, Maryland: United States Naval Institute. ISBN 978-0-87021-893-4.
- Johnston, Ian & McAuley, Rob (2000). The Battleships. MBI Publishing Company. ISBN 978-0-7603-1018-2.
- Levi, Antonio (1998). "The New American hero: Made in Japan". In Kittelson, Mary Lynn. The Soul of Popular Culture: Looking at Contemporary Heroes, Myths, and Monsters. Illinois, United States: Open Court Publishing Company. ISBN 978-0-8126-9363-8. Retrieved 29 March 2010.
- Lundgren, Robert (2014). The World Wonder'd: What Really Happened off Samar. Ann Arbor, Michigan: Nimble Books. ISBN 978-1-60888-046-1.
- Mizuno, Hiromi (2007). Lunning, Frenchy, ed. "When Pacifist Japan Fights: Historicizing Desires in Anime". Mechademia. Minnesota, United States: University of Minnesota Press. 2 (Networks of Desire): 104. doi:10.1353/mec.0.0007. ISBN 978-0-8166-5266-2. ISSN 1934-2489. Retrieved 29 March 2010.
- Reynolds, Clark G. (1968). The Fast Carriers; The Forging of an Air Navy. New York, Toronto, London, Sydney: McGraw-Hill Book Company.
- Reynolds, Clark G (1982). The Carrier War. Time-Life Books. ISBN 978-0-8094-3304-9.
- Skulski, Janusz (2004) [1988]. The Battleship Yamato: Anatomy of a Ship Conway Maritime Press. ISBN 978-0-85177-940-9
- Spurr, Russell (1981). A Glorious Way to Die: The Kamikaze Mission of the Battleship Yamato, April 1945. Newmarket Press. ISBN 0-937858-00-5.
- Steinberg, Rafael (1978). Island Fighting. Time-Life Books Inc. ISBN 0-8094-2488-6
- Steinberg, Rafael (1980) Return to the Philippines. Time-Life Books Inc. ISBN 0-8094-2516-5
- Wheeler, Keith (1980). War Under the Pacific. Time-Life Books. ISBN 0-8094-3376-1
- Whitley, M. J. (1999). Battleships of World War Two: An International Encyclopedia. Annapolis, Maryland: Naval Institute Press. ISBN 1-55750-184-X.
- Willmott, H.P. (2000). The Second World War in the Far East. Wellington House. ISBN 978-0-304-35247-0.
- Wright, Peter (2009). "Film and Television, 1960–1980". In Bould, Mark; Butler, Andrew; Roberts, Adam; Vint, Sherryl. The Routledge Companion to Science Fiction. Oxon, United Kingdom: Routledge. ISBN 978-0-415-45378-3. Retrieved 29 March 2010.
- Yoshida, Mitsuru; Minear, Richard H. (1999) [1985]. Requiem for Battleship Yamato. Annapolis, Maryland: Naval Institute Press. ISBN 978-1-55750-544-6. OCLC 40542935.
External links
| Wikimedia Commons has media related to Yamato. |
- Yamato Museum
- Joseph Czarnecki, "What did the USN know about Yamato and when?"
- US Navy history page on the Yamato
- The Battle Off Samar – Taffy III at Leyte Gulf website by Robert Jon Cox
Coordinates: 30°22′N 128°04′E / 30.367°N 128.067°E