Operation Pamphlet
| Operation Pamphlet | |
|---|---|
| Part of World War II | |
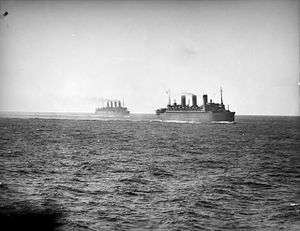 The converted ocean liners Aquitania (at left) and Île de France travelling in convoy during Operation Pamphlet | |
| Location | Between Egypt and Australia |
| Objective | To return the 9th Division to Australia |
| Date | 24 January to 27 February 1943 |
| Outcome | Allied success |
Operation Pamphlet, also called Convoy Pamphlet, was a convoy operation of World War II conducted during January and February 1943 to transport the Australian Army's 9th Division home from Egypt. The convoy involved five transports, which were protected from Japanese warships during their trip across the Indian Ocean and along the Australian coastline by several Allied naval task forces. The 9th Division boarded the ships during late January 1943, and the convoy operation began on 4 February. No contact was made between Allied and Japanese ships, and the 9th Division arrived in Australian ports during late February with no losses from enemy action.
The operation was initiated after the British and United States governments agreed to the Australian Government's request that the 9th Division be transferred to Australia, thereby ending the Second Australian Imperial Force's role in the North African Campaign. This followed a lengthy debate between the respective national leaders, with Winston Churchill and Franklin D. Roosevelt attempting to convince Australian Prime Minister John Curtin withdraw his request until the Allied victory in North Africa was complete. Curtin was unwilling to agree to such a delay, as he and the Allied military leaders in the South-West Pacific believed that the veteran division was needed to bolster the forces available for planned offensive operations in New Guinea.
A convoy to return the 9th Division to Australia was assembled in the Red Sea near Massawa over late January to early February 1943. The ships began their voyage across the Indian Ocean on 4 February and, after refuelling at Addu Atoll, arrived safely at the West Australian port of Fremantle on 18 February. Four of the transport ships subsequently continued to the Australian east coast, with one docking at Melbourne on 25 February and the remainder arriving at Sydney two days later. After its return to Australia, the 9th Division was retrained for jungle warfare and made an important contribution to operations conducted in New Guinea during late 1943.
Background
During 1940 and 1941, three infantry divisions and other units assigned to I Corps of the Second Australian Imperial Force (AIF) were transported to the Middle East, where they took part in several campaigns against German, Italian and Vichy French forces.[1][2] Following the outbreak of the Pacific War, the corps headquarters and the 6th and 7th Divisions were returned to Australia in early 1942 to bolster the country's defences; the movement of these troops was designated Operation Stepsister. The Australian Government agreed to British and US requests to temporarily retain the 9th Division in the Middle East in exchange for the deployment of additional United States Army units to Australia and Britain's support for a proposal to expand the Royal Australian Air Force to 73 squadrons.[3] The 9th Division subsequently played an important role in the First Battle of El Alamein during July 1942 and the Second Battle of El Alamein between 23 October and 4 November.[4] The division suffered many casualties during the latter engagement, and did not take part in the pursuit of the retreating Axis forces.[5]
Several factors influenced the decision made by the Australian Government in October 1942 to recall the 9th Division to Australia. Firstly, the Government and the commander of the Australian Military Forces, General Thomas Blamey, wanted to relieve the 6th and 7th Divisions from combat in the New Guinea Campaign and Blamey considered the 9th Division to be better prepared for this responsibility than his militia forces or US Army units.[6] Secondly, the commander of Allied forces in the South West Pacific Area, General Douglas MacArthur, had been pressing the US and Australian Governments for reinforcements to conduct offensive operations against Japanese positions. Other factors influencing the decision were a desire to concentrate the Australian Army in a single theatre, the increasing difficulty in finding replacements for the 9th Division's casualties given the Army's manpower shortages, the political difficulties associated with implementing reforms to permit militia units to serve outside Australian territory, and concerns that a prolonged absence from Australia would affect morale among the 9th Division's soldiers.[7]
On 17 October 1942, Australian Prime Minister John Curtin cabled British Prime Minister Winston Churchill to request that the 9th Division be returned to Australia. In the cable Curtin stated that, owing to Australia's manpower shortage and the demands of the war in the Pacific, it was no longer possible to provide enough reinforcements to sustain the division in the Middle East. The British Government initially resisted this request on the grounds that the 9th Division was required for the upcoming offensive at El Alamein. On 29 October (six days into the battle) Curtin again cabled Churchill, stating that Australia needed the division in the Pacific and in a fit state to participate in offensive operations.[8] On 1 November, US President Franklin D. Roosevelt wrote to Curtin proposing to send an additional army division to Australia if the Australian Government agreed to retain the 9th Division in the Middle East. Curtin, acting on the advice of MacArthur, responded to Roosevelt on 16 November rejecting this suggestion, and again requested that the 9th Division be returned.[9]
On 21 November, the commander of the 9th Division, Major General Leslie Morshead, was informed by General Harold Alexander, the commander-in-chief of the Middle East Command, that a decision had been made to return the division to Australia.[9] Churchill subsequently told the Australian Government on 2 December that while he was prepared to recommend to Roosevelt that the 9th Division be returned, the resultant diversion of shipping would reduce the size of the build-up of United States military personnel in Britain and North Africa by 30,000 men. In the same cable, Churchill also stated that due to a shortage of shipping the 9th Division's heavy equipment would need to remain in the Middle East.[10] On 3 December Roosevelt again wrote to Curtin to suggest that the 9th Division remain in the Middle East until the final defeat of the Axis forces in North Africa. Roosevelt also informed Curtin that the United States Army's 25th Infantry Division would be transferred to Australia during December.[9][10] Following these messages the Government sought advice from Blamey and MacArthur on whether it was necessary for the 9th Division to return with its heavy equipment, and was informed that the necessary supplies could be sourced from American resources once the unit arrived in Australia.[11]
Curtin replied to Churchill and Roosevelt on 8 December, and again stressed the need to return the 9th Division to Australia as soon as possible to make good the Army's losses to tropical diseases and prepare for future offensives in the Pacific. In his message he agreed to leave the division's heavy equipment in the Middle East, and requested only that it travel with items necessary to quickly re-enter combat in the South West Pacific.[12] No further debate took place, and on 15 December Churchill informed Curtin that shipping would be made available in late January to transport the division and a small portion of its equipment to Australia.[11]
Preparations
.jpg)
The 9th Division's role in the Second Battle of El Alamein ended on 5 November 1942.[13] From 30 November the division travelled to Palestine by road, and all its units arrived there by 9 December. After settling into camps located between Gaza and Qastina, the 9th Division undertook a period of rebuilding and training, and many soldiers were granted leave.[14] On 22 December, a formal parade involving the entire division was conducted at Gaza Airport.[15]
Preparations to return the 9th Division to Australia began in late December 1942. On 26 December, all of the AIF unit commanding officers in the Middle East were informed that their commands were to return to Australia; the movement was code-named "Liddington". Tight security was instituted for this operation, and more junior personnel who needed to be informed of the move were told that their units were being transferred to Egypt. While many members of the AIF initially believed that they would take part in further fighting in the Mediterranean, as preparations continued it became obvious that the units were about to undertake a long sea voyage. The 9th Division's artillery, tanks and other heavy equipment were transferred to ordnance depots during early January 1943, and on the 16th of that month the division began moving to the Suez Canal area, from where it was to embark. The movement of the 9th Division took place in groups, each of which spent one or two days at a transit camp at Qassin where all vehicles were handed to British authorities.[16] The 9th Division also began training for jungle and amphibious warfare before departing the Middle East. During January each brigade spent three days exercising in the rough terrain near Bayt Jibrin, which was believed to be the nearest equivalent to a jungle in Palestine. Most of the brigade commanders and several officers from each of the infantry battalions also attended short courses at the British amphibious school on the Bitter Lakes in Egypt.[17]
The Royal Navy also made preparations for the movement of the 9th Division back to Australia in late 1942. Four large troop ships were allocated to the task, and the British Chiefs of Staff Committee initially proposed to Churchill that they sail across the Indian Ocean without a protective escort. However, as the eastern Indian Ocean was within range of Japanese warships based at Singapore and Japanese submarines had occasionally attacked ships near Aden this was judged to be unacceptably risky, especially as it was not likely that the movement of so many soldiers could be kept secret.[18][19] Moreover, transporting the division without an escort would have violated the long-standing policy of assigning at least one capital ship to protect troop convoys in this region, and would not have been accepted by the Australian government.[18] In November, the Chiefs of Staff Committee decided to allocate an escort to the convoy, but did not specify what it should comprise.[20]
The ships assigned to carry the 9th Division to Australia were the converted ocean liners Aquitania, Île de France, Nieuw Amsterdam and Queen Mary; these four large vessels had previously transported Australian soldiers to the Middle East and other locations.[21] The liners were heavily tasked transporting Allied military personnel across long distances, and arrived at Suez individually. Aquitania put in from Australia on 5 January, Queen Mary was diverted from transporting American personnel across the Atlantic and arrived from the United Kingdom on 18 January, Nieuw Amsterdam completed one of her frequent voyages along the coast of east Africa on 31 January and Île de France arrived in late January.[22] In addition to the four converted liners, the armed merchant cruiser HMS Queen of Bermuda was transferred from transport duties in the Indian Ocean to both augment the convoy's escort and embark Australian personnel.[23] The four liners were heavily armed with anti-aircraft guns, manned by dedicated personnel, as well as two 6-inch guns each.[24]
Voyage
Indian Ocean
The AIF began embarking on the troop ships on 24 January 1943. As the Suez Canal ports were too small for the four troop ships to load simultaneously, the embarkation process was staged and the convoy's five vessels sailed separately through the northern Red Sea and rendezvoused near Massawa in Eritrea.[16] British destroyers HMS Pakenham, Petard, Derwent and Hero and the Greek destroyer Vasilissa Olga were transferred from the Mediterranean Fleet to guard the troop ships from attack by Japanese submarines as they passed through the Red Sea.[25][19]

Queen Mary was the first ship to complete loading, and left Port Tewfik on 25 January. She anchored at Massawa three days later, and the soldiers on board endured very hot conditions until she resumed her journey.[26] Aquitania was next to load, and embarked the entire 20th Brigade between 25 and 30 January.[27] Île de France completed loading and departed Egypt on 28 January, and Nieuw Amsterdam and Queen of Bermuda sailed together on 1 February.[28] Overall, 30,985 Australians were embarked on Queen of Bermuda and the converted liners; Aquitania carried 6,953, Île de France 6,531, Nieuw Amsterdam had 9,241 on board, 9,995 sailed on Queen Mary and 1,731 on Queen of Bermuda.[1][16] A total of 622 AIF personnel remained in the Middle East after the five ships departed Egypt, but this figure was steadily reduced to below 20 by March 1943.[16]
The five ships of the convoy rendezvoused off Perim on the morning of 4 February, and passed Aden later that day.[1][29] The destroyers left the convoy as it passed Cape Guardafui, and were replaced by the heavy cruiser HMS Devonshire and light cruiser HMS Gambia which were to serve as ocean escorts. Captain James Bisset, commander of the Queen Mary, served as the convoy commodore. The four large converted liners sailed in line abreast formation and Queen of Bermuda's position varied based on the time of day and the situation. The convoy travelled at a speed of 17 knots (31 km/h); while the liners typically sailed at much higher speeds during their independent voyages, they were constrained by the maximum which Queen of Bermuda could maintain. Bisset was frustrated by the decision to sail the transports in convoy, as it considerably increased the time taken to complete the voyage and entailed lengthy delays for the heavily-tasked Queen Mary.[24]
After entering the Indian Ocean, the convoy sailed south-east. The ships manoeuvred together in a zigzag course; avoiding collisions during the frequent turns placed heavy demands on the watch-keeping officers, who found their shifts exhausting.[30] The troops endured very uncomfortable conditions on the hot and crowded ships, but morale was high. They entertained themselves with sports, sun baking and gambling, and those on Queen Mary could attend concerts performed by a regimental brass band. The 9th Division's officers enjoyed somewhat better conditions, which frustrated some of the other ranks.[31][32] The 9th Division's preparations for jungle warfare continued during the voyage, with all personnel attending daily lectures which were delivered by officers on the lessons which had been learnt during the previous fighting in the Pacific.[33]
The convoy arrived at Addu Atoll on the evening of 9 February, and anchored there to refuel and take on supplies.[34] This atoll served as a secret supply base for Allied vessels in the Indian Ocean, and the Australian soldiers were not told where they were while the refuelling took place.[16] The troops were not permitted to go ashore, but regarded the sight of the tropical atoll as a welcome change from the arid Middle East.[35] After the ships were refuelled, the convoy sailed on the afternoon of 10 February.[36]
A strong escort force was provided to guard the convoy as it travelled through the eastern Indian Ocean. This was considered the most dangerous stage of the voyage, as the convoy would pass within range of the Japanese warships based at Singapore.[36] To counter this threat, the convoy's escort was reinforced for several days by Force "A" of the British Eastern Fleet. The force comprised the battleships HMS Warspite, Resolution and Revenge, as well as the light cruiser HMS Mauritius and six destroyers.[37] The Australian soldiers were pleased to see so many warships sailing near their transports on 10 February, though Force A later patrolled over the horizon from the convoy.[36][38] When the convoy reached a point 800 miles (1,300 km) from the Western Australian port of Fremantle its escort was reinforced by the Dutch cruisers HNLMS Jacob van Heemskerck and Tromp, as well as the destroyers HNLMS Tjerk Hiddes and Van Galen.[25][32][37]
The ships arrived at Fremantle on 18 February.[37] The sight of the West Australian coast had been eagerly anticipated by the Australian soldiers, who broke into cheers when it first became visible shortly before noon that day.[32] Nieuw Amsterdam and Queen of Bermuda berthed in Fremantle Harbour, and the other three troop ships dropped anchor at Gage Roads. The Western Australian members of the 9th Division were disembarked, and the ships loaded supplies and mail. As Queen of Bermuda left the convoy at Fremantle, her remaining 517 passengers were transferred to Nieuw Amsterdam. This resulted in considerable overcrowding on board the liner for the remainder of her voyage.[32]
Australian waters
The Australian Government was concerned about the safety of the troop ships in Australian waters. At a meeting held on 17 February, the Advisory War Council considered recommending that the soldiers be moved to the east coast by rail. It decided against this option after being informed that, due to the limited capacity of the Trans-Australian Railway, it would take several months to move the 30,000 personnel. Instead, the council recommended that the convoy continue but be given "the maximum protection possible".[37] Due to the presence of Japanese submarines off the Australian coast, tight security measures were instituted after the convoy arrived at Fremantle; civilian communications between Western Australia and the east coast were cut off for several days, and Curtin asked the media to not report the movement of the 9th Division. As part of a confidential briefing on 24 February, Curtin told journalists that he had not slept well for three weeks due to concerns for the safety of the convoy.[39]
When the convoy sailed from Fremantle on 20 February it was escorted by the Australian light cruiser HMAS Adelaide, as well as Jacob van Heemskerck and Tjerk Hiddes. In order to avoid any enemy ships or submarines operating off the Australian coast, the convoy's route took it well to the south of the continent. The escort force was strengthened on 24 February when the convoy rendezvoused with Task Group 44.3; this force comprised the heavy cruiser HMAS Australia and American destroyers USS Bagley, Helm and Henley, and had been dispatched from Sydney on 17 February.[40] Adelaide and the Dutch warships left the convoy shortly afterwards to escort Nieuw Amsterdam into Melbourne; the liner docked there on the afternoon of 25 February.[37][40] Task Group 44.3 escorted the remaining ships to Sydney, passing south of Tasmania before proceeding up the east coast. The escort was strengthened by Jacob van Heemskerck and the French destroyer Triomphant as the convoy passed the eastern end of the Bass Strait.[37][41] The three converted liners arrived at Sydney on 27 February 1943, completing Operation Pamphlet without loss.[19][37] Despite the official secrecy concerning the convoy, large crowds assembled on vantage points around Sydney Harbour to watch the ships arrive. Queen Mary anchored off Bradleys Head and the other two liners berthed at Woolloomooloo.[41] Curtin officially announced that the 9th Division had returned to Australia in a speech delivered to the House of Representatives on 23 March.[42]
Aftermath
The ships involved in Operation Pamphlet rapidly departed for other duties. After unloading her troops at Fremantle, Queen of Bermuda departed for the United Kingdom on 3 March and arrived there on 13 April.[43] Nieuw Amsterdam sailed from Melbourne bound for San Francisco via New Zealand on 6 March carrying 2189 Allied military personnel; she completed her voyage on 22 March. Queen Mary embarked 8,326 United States military personnel in Sydney, and departed for the United Kingdom on 22 March. Sailing at 28 knots (52 km/h), she arrived at Gourock in Scotland exactly one month later.[44] Aquitania left Sydney at around the same time, and completed her voyage to New York City on 4 May.[45]
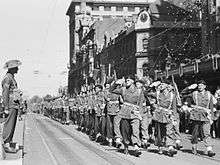
After arriving in Australia, all members of the 9th Division were given three weeks leave. The men were then assembled in their home state capital and took part in a welcome home march; these marches were conducted to acknowledge the division's service in the Middle East and advertise a war loan drive. Following the marches the division re-assembled at training camps on the Atherton Tableland in far North Queensland where it was to be retrained for jungle warfare.[46] The 9th Division next saw action against Japanese forces during the Salamaua–Lae campaign in September 1943; had the division not returned from the Middle East, at least part of this task would have fallen to less experienced Militia units.[8]
References
Citations
- 1 2 3 4 Faulkner and Wilkinson (2012), p. 168
- ↑ "Second World War, 1939–45". Australian War Memorial. Retrieved 17 April 2015.
- ↑ Hasluck (1970), pp. 73–87, 177
- ↑ Coates (2006), pp. 166–176
- ↑ Long (1973), pp. 283–284
- ↑ Hasluck (1970), pp. 193, 202
- ↑ Hasluck (1970), pp. 193–194
- 1 2 Long (1973), p. 285
- 1 2 3 Maughan (1966), p. 749
- 1 2 Hasluck (1970), p. 201
- 1 2 Maughan (1966), p. 750
- ↑ Hasluck (1970), p. 202
- ↑ Maughan (1966), p. 742
- ↑ Maughan (1966), pp. 747–748
- ↑ Maughan (1966), pp. 751–752
- 1 2 3 4 5 Maughan (1966), p. 753
- ↑ Threlfall (2014), pp. 160–162
- 1 2 Day (1993), p. 91
- 1 2 3 Roskill (1956), p. 433
- ↑ Day (1993), p. 92
- ↑ Plowman (2003), p. 366
- ↑ Plowman (2003), pp. 367–372
- ↑ Plowman (2003), pp. 370–371
- 1 2 Plowman (2003), p. 375
- 1 2 Rohwer, Hümmelchen and Weis (2005), p. 229
- ↑ Plowman (2003), p. 368
- ↑ Plowman (2003), pp. 369–370
- ↑ Plowman (2003), pp. 370–373
- ↑ Plowman (2003), p. 374
- ↑ Plowman (2003), p. 376
- ↑ Johnston (2002), pp. 138–140
- 1 2 3 4 Plowman (2003), p. 379
- ↑ Threlfall (2014), p. 162
- ↑ Plowman (2003), p. 377
- ↑ Plowman (2003), pp. 377–378
- 1 2 3 Plowman (2003), p. 378
- 1 2 3 4 5 6 7 Gill (1968), p. 287
- ↑ Maughan (1966), p. 754
- ↑ Loyd and Hall, pp. 136, 140
- 1 2 Plowman (2003), p. 381
- 1 2 Plowman (2003), p. 382
- ↑ "Return of 9th Division to Australian Announced". The Canberra Times. National Library of Australia. 24 March 1943. p. 2. Retrieved 29 March 2015.
- ↑ Plowman (2003), p. 380
- ↑ Plowman (2003), p. 384
- ↑ Layton (2015)
- ↑ Coates (1999), p. 44
Works consulted
| Wikimedia Commons has media related to Operation Pamphlet. |
- Coates, John (1999). Bravery Above Blunder: The 9th Australian Division at Finschhafen, Sattelburg, and Sio. South Melbourne, Australia: Oxford University Press. ISBN 0195508378.
- Coates, John (2006). An Atlas of Australia's Wars. Melbourne: Oxford University Press. ISBN 0-19-555914-2.
- Day, David (1993). Reluctant Nation: Australia and the Allied Defeat of Japan 1942–45. Melbourne: Oxford University Press. ISBN 0195534530.
- Faulkner, Marcus; Wilkinson, Peter (2012). War at Sea: A Naval Atlas, 1939–1945. Annapolis, Maryland: Naval Institute Press. ISBN 9781591145608.
- Gill, G. Herman (1968). Royal Australian Navy, 1942–1945. Australia in the War of 1939–1945, Series 2—Navy. Volume II (1st ed.). Canberra: Australian War Memorial. OCLC 164291844.
- Hasluck, Paul (1970). The Government and the People 1942–1945. Australia in the War of 1939–1945. Series 4—Civil. Volume II. Canberra: Australian War Memorial. 6429367X.
- Johnston, Mark (2002). That Magnificent 9th: An Illustrated History of the 9th Australian Division 1940–46. Sydney: Allen & Unwin. ISBN 1-86508-654-1.
- Lloyd, Clem; Hall, Richard, eds. (1997). Backroom Briefings: John Curtin's War. Canberra: National Library of Australia. ISBN 0642106886.
- Layton, J. Kent (2015). The Edwardian Superliners: A Trio of Trios. Stroud, United Kingdom: Amberley Publishing. ISBN 1445614405.
- Long, Gavin (1973). The Six Years War. A Concise History of Australia in the 1939–1945 War. Canberra: The Australian War Memorial and the Australian Government Printing Service. ISBN 0-642-99375-0.
- Maughan, Barton (1966). Tobruk and El Alamein. Australia in the War of 1939–1945, Series 1—Army. Volume III (1st ed.). Canberra: Australian War Memorial. OCLC 954993.
- Plowman, Peter (2003). Across the Sea to War: Australian and New Zealand Troop Convoys from 1865 Through Two World Wars to Korea and Vietnam. Kenthurst, New South Wales: Rosenberg Publishing. ISBN 1877058068.
- Rohwer, Jürgen; Hümmelchen, Gerhard; Weis, Thomas (2005). Chronology of the War at Sea: 1939–1945: The Naval History of World War II (3rd revised ed.). Annapolis, Maryland: Naval Institute Press. ISBN 1591141192.
- Roskill, S.W. (1956). War at Sea 1939–1945, Volume 2: The Period of Balance. London: HMSO. OCLC 881709047.
- Threlfall, Adrian (2014). Jungle Warriors : From Tobruk to Kokoda and beyond, How the Australian Army Became the World's Most Deadly Jungle Fighting Force. Sydney: Allen & Unwin. ISBN 9781742372204.