Richard Byron (Royal Navy officer)
| Richard Byron | |
|---|---|
| Born | 1769 |
| Died |
1837 (aged 67–68) Leatherhead, England |
| Allegiance |
|
| Service/branch |
|
| Years of service | 1782–1814 |
| Rank | Vice-admiral |
| Battles/wars | |
| Awards | Companion of The Most Honourable Order of the Bath |
Rear-Admiral Richard Byron CB (1769–1837) was an officer in the British Royal Navy. He served in the American Revolutionary War where he saw action at the Battle of the Saintes, the French Revolutionary Wars where he fought at the Glorious First of June and the Battle of Groix, and the Napoleonic Wars where he served in North-American waters. Byron was in command of HMS Belvidera when she was attacked by a squadron of heavy frigates in one of the first actions of the 1812 Anglo-American War.
Personal life
Richard Byron was born in 1769 to the Honourable Richard Byron, rector of Haughton, and Mary, née Farmer. He was the nephew of Admiral John Byron.[1] On 23 September 1803, he married Sarah Sykes, the daughter of a navy agent and the sister of John Sykes (1773–1858), later to be Vice-admiral John Sykes.[1] They had four sons. Byron died in Leatherhead on 2 September 1837, aged 68. His wife outlived him by several years, passing in August 1861.[2]
Early career
In October 1781 he was listed as a volunteer aboard his cousin's ship, HMS Proserpine and when his cousin, George Byron, was given command of the newly built, HMS Andromache in January 1782, the young Richard went with him as an Able seaman.[1] Andromache sailed for the West Indies, arriving in the Dominica Channel on 9 April 1782 and was thus present at the Battle of the Saintes. Returning to home waters, Andromache joined Lord Howe's fleet in The Channel and later participated in the relief of Gibraltar.[3][1]
On 2 June 1784, still serving under his cousin, Byron was promoted to midshipman of HMS Druid, searching for smugglers along the Devon and Cornish coast.[1] Byron served for a while under Druid's next captain, Joseph Ellison, who joined the ship in March 1785, then in November 1788, Byron rejoined his cousin who was at that time in command of the 36-gun Phoenix. Phoenix sailed for the East Indies where she took part in actions against Tippoo Sahib. During the campaign, the boat carrying George Byron overturned and, severely injured, he was sent home to England, where he later died. Richard Byron, who had been serving as master's mate, then transferred to HMS Crown, under the flag of Rear-admiral William Cornwallis, as a midshipman once more. Cornwallis later moved his flag to Minerva and was soon after followed by Byron. On 1 October 1792, Byron was promoted to lieutenant of the 36-gun HMS Perseverance.[1] When Perseverance returned to home waters in July the following year, Byron was on leave until he was appointed to Rear-admiral Caldwell's flagship, Impregnable in October 1793. Byron was aboard Impregnable when she fought in a fleet action on 1 June 1794.
Glorious day

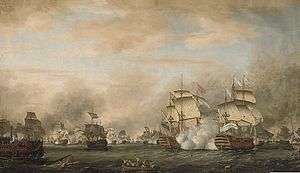
Admiral Lord Howe's Channel Fleet was in the Atlantic Ocean, when on 1 June 1794, it intercepted and engaged the French Atlantic Fleet, under the commanded of Rear-Admiral Villaret-Joyeuse at latitude 44° 26' 58" north, longitude 13° 03' 27" west, approximately 400 nautical miles (700 km) south-west of Ushant.[4] The battle was the last of three engagements between these fleets, that occurred over five days.[5]
Howe's initial plan was for his 25 ships to independently turn and cut the enemy line of 26 ships, so that each British ship passed between the stern and bow of a different pair of French ships, raking both. Once through the line, the British ships would turn and engage their opposite number on the leeward side thus preventing any possibility of an escape.[6] Only a few captains followed Howe's orders however, either because they had misunderstood or had willfully chosen to disobey, or they had been prevented from doing so by damage incurred in the previous actions. Despite this the British were able to capture seven ships, although one almost immediately sank, while the rest of the French fleet was so badly damaged it was forced to retire.[7]
The British suffered 290 killed and 858 wounded during this and the encounters which took place on 28 and 29 May. French accounts give their losses as 3,000 killed or wounded; however as the dead and wounded on board the six captured ships amounted to 690 and 580 respectively, plus the 300 or so estimated to have gone down with the seventh, British estimates are much higher some claiming 7,000.[8][9]
Impregnable was eighth in line and one of those that did not engage as Howe intended.[10] She had seven of her crew members killed and 24 wounded.[11] After the battle, Byron served aboard the 100-gun, HMS Queen Charlotte and in her took part in another large engagement off the island of Groix a year later.[1]
Action off Groix

Having received word that Villaret had left Brest, the Channel Fleet of 14 battleships, by then under Alexander Hood, set off in pursuit. On 22 June, the British fleet was at 47°4′N 4°16′W / 47.067°N 4.267°W, when at 03:30 the 12 ships-of-the-line of the French Atlantic Fleet were spotted. Hood sent his fastest ships, the Sans-Pareil, Orion, Colossus, Irresistible, Valiant, and Russel, ahead.[12] Although both fleets were affected by periods of calm, by 19:00 the leading British ships were in a position to open fire. The chase continued through the night and at 03:00 the following morning the wind began to pick up. By dawn, Queen Charlotte, which had forged ahead through superior sailing, was alongside Irresistible with the rest of the British fleet spread out behind. The French fleet by contrast had remained together, except three or four ships astern, the closest of which was some three miles ahead.[12]
By 06:00 the British were beginning to overhaul the French and there was some sporadic firing. At around 06:15, the Queen Charlotte engaged Formidable which after receiving a broadside from the passing Sans Pareil, soon struck.[13] The Queen Charlotte's sails and rigging had become so badly damaged that by 07:14, she was beginning to drift out of the action. She continued to fight however, firing into what ships she could and forcing the surrender of the Alexandre before leaving the battle completely.[13]
Only eight British ships, the rest being too far astern, fought with all but four ships of the French Fleet, managing to capture three before Hood called off the action.[13] The British had 31 men killed and 113 wounded. Byron's ship, Queen Charlotte, had four of her crew killed and 32 wounded. Total French losses cannot be determined but aboard the three captured ships, there were 670 killed and wounded.[14]
Command
In September 1797, Byron joined HMS Doris then the following month he joined La Virginie, as flag-lieutenant to Hugh Christian, and in her sailed to the Cape of Good Hope.[1] On 22 June 1798, Byron was given his first command, the brig, HMS Cornwallis but he held this position for less than a month. He did not find employment again until 12 August 1801, when he was appointed to the 18-gun Rosario, a French prize. In her he sailed to the West Indies where he served on the Jamaica station.[1] Byron made Post-captain in August 1802 and in October the following year was due to command Inconstant, but after she was fitted out, his commission was revoked and he didn't command again until he was received command of the 36-gun Belvidera in February 1810.[1] It was while in command of Belvidera that Byron became involved in one of the first conflicts of the 1812 Anglo-American war.[15]
Anglo-American war
On 23 June 1812 Belvidera was 35 miles south-west of the Nantucket Shoals where she was waiting to ambush the French privateer Marengo. There an American squadron spotted Belvidera. The United States had declared war on Britain four days previously but word had not yet reached Byron, who nevertheless prudently moved away.[16] The heavy frigates President and United-States, together with the 18-pounder 36-gun frigate Congress, the 18-gun ship-sloop Hornet and the 16-gun brig-sloop Argus, gave chase.

After ten hours in pursuit, the leading American ship, President, had closed to 600 yards and began firing. One of Belvidera's guns was hit and the resulting explosion killed two seaman and wounded three others. Belvidera returned fire and a running battle ensued.[16] Ten minutes later, President was forced to suspend her attack when one of her guns burst, killing or injuring 16 of her crew.[17]
When President renewed her attack she did so by bringing her starboard guns to bear, which caused considerable damage to Belvidera's sails and rigging. While repairs were carried out, Byron personally supervised the chase guns, despite having sustained a wound to his leg. By 17:00, President had closed the gap to 400 yards and again put her helm over in order to give Belvidera a second broadside.[17] President continued alternating between her chase and maindeck guns and only once did Belvidera yaw in an attempt to use hers, but President matched the manoeuvre and Belvidera was forced to turn back without firing.[17]
At 18:25 it became apparent to Byron that President was now in a position overhaul her opponent and bring her to close action. Byron therefore gave the order to jettison four of Belvidera's anchors. This loss of weight, together with President's constant yawing, allowed Belvidera to put so much water between them that President ceased firing. Congress however was still in the chase, overtaking President at 18:30 and opening fire. Finding her shots falling short however, she too stopped firing soon after. Belvidera continued to shed weight, throwing her water and boats over the side in an attempt to put distance between her and her pursuers, and by 20:00, she was two miles ahead of the nearest American ship.[18] Having by this time repaired much of the damage that had been done, Byron ordered the studding sails out and set course for Halifax. The American squadron gave up the chase and returned to their original mission, searching for the Jamaican merchant fleet, not realising that Belvidera had, over the last 15 hours, led them further away from it.[19]
Belvidera arrived in Halifax on 27 June with a number of American prizes she had managed to capture en route. On hearing of the altercation, Admiral Sawyer despatched the sloop Colibri to New York to demand an explanation. Once confirmation was received, the schooner Mackerel sailed to England with news of the war, arriving on 25 July.[1][20]
Constitution
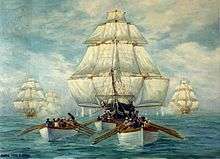
On 14 July 1812, Byron, still in command of Belvidera, was part of a squadron under Philip Broke which also included: Shannon, Aeolus, Guerrière and the 64-gun Africa. The squadron was cruising off the coast of New Jersey when at 15:00, on 16 July, a strange sail was spotted. Having received word two days previous, that an American squadron was in the vicinity, Broke ordered his ships to investigate. The light winds caused the pursuit to drag on into the night when the British ships lost sight of each other and their quarry.[21]
At about 22:00 Guerrière had relocated the ship and by 03:00 the following morning, closed to within half a mile. When Guerrière spotted two other frigates which did not appear to answer her signals correctly, she erroneously believed them to be part of the American squadron, and veered away but the two frigates were in fact Belvidera and Aeolus. The heavy American frigate, USS Constitution, it was later discovered, was sailing alone and the result of Guerrière's course change was that when daylight came, the nearest British ship was the Belvidera four miles away. Guerrière was a little astern of Belvidera and, Shannon and Aeolus two miles further back from her. The larger, slower Africa was already a long way astern of these two and the distance was widening all the time as the smaller, faster frigates pushed on.[21]
By 05:30 the wind had died completely and Constitution's captain, Isaac Hull, ordered the boats launched to take her in tow. In order to stay in touch, Byron had to imitate the manoeuvre and ignore the danger to his boats' crews from Constitution's five 24-pound stern chasers. Within a few minutes, the other British frigate captains had also begun to tow their vessels.[21] Just before 07:00, Constitution entered shallower water and this allowed her crew to row out a kedge anchor to winch up to. This was abandoned shortly after 09:00 when the wind picked up and Belvidera began to gain ground.[22] Constitution was thus forced to jetison some cargo in order to maintain her advantage. When the wind dropped again, Byron ordered his boats to row out and began warping using two anchors alternately. By 14:00 this had resulted in Belvidera getting close enough to exchange fire with its chase but with little effect on either side. An hour later the breeze increased and Constitution once more began to pull away.[23]
By daybreak on 18 July, Belvidera was four miles behind and the next British ship a further six miles. At 09:00, an American merchant vessel was spotted and in a ruse de guerre to lure the ship closer, Belvidera hoisted American colours. In response, Constitution raised British colours and the merchantman veered off. The wind held all day and by 16:00 Constitution had increased her lead to seven miles, and by dawn the next day, she had doubled this distance. The British continued their pursuit until 08:30 when they headed off to the north-east.[23]
Later life
Byron retired from the navy on 25 October 1814. He was made a Companion of The Most Honourable Order of the Bath (CB) on 4 June 1815. Promoted Rear-admiral 10 January 1837, Byron died 2 September that year.[2]
Citations
- 1 2 3 4 5 6 7 8 9 10 11 Tracy (p.67)
- 1 2 Tracy (p.68)
- ↑ Winfield (p.213)
- ↑ Willis (p.28)
- ↑ Willis (p.39)
- ↑ Willis (pp.57–58)
- ↑ James (Vol. I) (p.153)
- ↑ Willis (p.75)
- ↑ James (Vol. I) (pp.152–153)
- ↑ James (Vol. I) (p.147)
- ↑ Willis (p.74)
- 1 2 James (Vol. I) (p.245)
- 1 2 3 James (Vol. I) (p.246)
- ↑ James (Vol. I) (p.248)
- ↑ James (Vol.VI) (p.66)
- 1 2 James (Vol. VI) (pp.80–81)
- 1 2 3 James (Vol.VI) (p.82)
- ↑ James (Vol.VI) (p.83)
- ↑ James (Vol.VI) (pp.83–84)
- ↑ James (Vol.VI) (p.84)
- 1 2 3 James (Vol.VI) (p.92)
- ↑ James (Vol.VI) (pp.92–93)
- 1 2 James (Vol.VI) (p.93)
References
- James, William (2002) [1827]. The Naval History of Great Britain, Volume I, 1793–1796. London: Conway Maritime Press. ISBN 0-85177-905-0.
- James, William (2002) [1827]. The Naval History of Great Britain, Volume VI, 1811–1827. London: Conway Maritime Press. ISBN 0-85177-910-7.
- Tracy, Nicholas (2006). Who's Who in Nelson's Navy. London: Chatham Publishing. ISBN 1-86176-244-5.
- Willis, Sam (2013). In the Hour of Victory. London: Atlantic Books. ISBN 9780857895707.
- Winfield, Rif (2007) British Warships in the Age of Sail 1714–1792: Design, Construction, Careers and Fates. Seaforth Publishing. ISBN 978-1-84415-700-6.