USS Helena (CL-50)
  | |
| History | |
|---|---|
| Name: | Helena |
| Namesake: | City of Helena, Montana |
| Ordered: | 13 February 1929 |
| Awarded: |
|
| Builder: | New York Naval Shipyard, Brooklyn, New York |
| Laid down: | 9 December 1936 |
| Launched: | 27 August 1938 |
| Sponsored by: | Miss Elinor Carlyle Gudger |
| Commissioned: | 18 September 1939 |
| Honors and awards: |
|
| Fate: | Sunk, Battle of Kula Gulf, 6 July 1943 |
| Notes: | Approximate location of sinking: 7°46′S 157°11′E / 7.767°S 157.183°E |
| General characteristics (as built)[1][2] | |
| Class and type: | St. Louis-class light cruiser |
| Displacement: |
|
| Length: | 608 ft 8 in (185.52 m) |
| Beam: | 61 ft 5 in (18.72 m) |
| Draft: |
|
| Installed power: |
|
| Propulsion: |
|
| Speed: | 32.5 kn (37.4 mph; 60.2 km/h) |
| Complement: | 888 officers and enlisted men |
| Sensors and processing systems: | SG surface search radar |
| Armament: |
|
| Armor: |
|
| Aircraft carried: | 4 × SOC Seagull floatplanes |
| Aviation facilities: | 2 × stern catapults |
| General characteristics (1943)[3] | |
| Armament: |
|
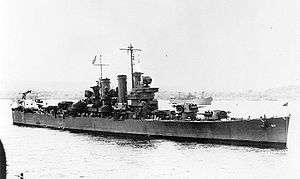
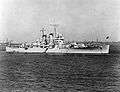
USS Helena (CL-50) was a St. Louis-class light cruiser of the United States Navy. Completed shortly before World War II, she was damaged in the attack on Pearl Harbor, and participated in several battles in the Pacific War. She was sunk by three surface-fired torpedoes at the battle of Kula Gulf in 1943. She was one of three U.S. light cruisers to be sunk during the war.[4]
In November 1942, Helena became the first US Navy ship to be awarded the Navy Unit Commendation medal.
USS Helena name history
Four United States Naval vessels have carried the name of Helena, the state capital of Montana. As of October 2015
The first ship was the gunboat Helena (PG-9), in service from 1896 to 1932. She saw action in Cuban waters during the Spanish–American War and later joined the Asiatic squadron for the Philippine Insurrection and was part of the Yangtze and South China patrols.
The second ship of the name was Helena (CL-50), a light cruiser in service from 1939 to 1943. Damaged at Pearl Harbor on 7 December 1941, she sailed again to action at Guadalcanal, Savo Island, and Cape Esperance where she sank a Japanese cruiser and a destroyer. She was lost in Kula Gulf in 1943 with 165 of her crew. Her survivors call her "the fighting ship that went in harm's way."
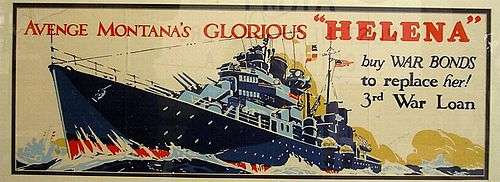
After CL-50 was sunk in 1943, war bonds were collected to fund a Fargo-class light cruiser to be named Helena (CL-113), but due to labor problems and other interference this ship was cancelled on 5 October 1944 before construction began.
In late 1944, war bonds raised in Montana were used to purchase the third ship to carry the name Helena: the heavy cruiser Helena (CA-75). She was launched 28 April 1945 and commissioned on 4 September 1945. She saw distinguished service in European and Chinese waters and combat service in Korea. During that time, the Helena served as flagship of the US Pacific Fleet and the Seventh Fleet. She became flagship of the First Fleet in 1961. Until her decommissioning on 29 June 1963, her crew gave financial assistance to disabled children in Helena. She was sold for scrap in 1974. Her brass propeller and some anchor chains were procured by the City of Helena and placed in a park honoring all the United States Navy ships that bore the name Helena.
The fourth and newest Helena, Helena (SSN-725), is a Los Angeles-class nuclear submarine. She was built at the Electric Boat Company in Groton, Connecticut in 1986 and commissioned in 1987. Assigned to the Pacific Fleet, she serves as a potent part of America's defense capability. Helena's insignia depicts the city's iconic fire tower.
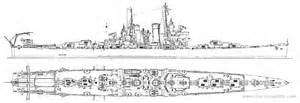
Design
The St. Louis-class cruisers were a two ship class consisting of St. Louis (CL-49) and Helena (CL-50). These were improved Brooklyn-class cruisers, and referred to as Brooklyn-class in some tables, that arose from the London Naval Treaty of 1930, which limited the construction of heavy cruisers, i.e., ships carrying guns with calibers between 6.1 inches and 8 inches. The United States did not favor this outcome, being of the opinion that the heavier-gunned ships more suited its needs in the Pacific. Brooklyn-class designs started in 1930, with the first four ships of the class ordered in 1933 and an additional three in 1934. Basic criteria had been that speed and range should match heavy cruisers and, when the Japanese Mogami-class cruisers carrying fifteen six-inch main guns appeared, the new U.S. ships would match their weaponry. Various combinations of armor and power plants were tried in the efforts to stay below the Treaty's 10,000 ton limit.[5]
The General Naval Board, in questioning 1935 changes to the London Naval Treaty, decided the following regarding the new St. Louis class cruisers:[6]
"Since the question of numbers is necessarily regulated by the total tonnage allowed and since that total tonnage after 1936 is largely indefinite owing to the uncertainties of the 1935 Conference, the Board considers that for now the properties of the individual ship are of greater importance than the number of ships."
The St. Louis class had newer and improved higher-pressure boilers, and the boiler arrangement used the "unit system" of alternating boiler and engine rooms. This was to prevent a ship from being immobilized by a single unlucky hit. Additionally, anti-aircraft (AA) armament was improved. They were the first U.S. cruisers to be armed with twin five-inch (127 mm) 38-caliber guns. They could be distinguished visually from the Brooklyn's by the placement of the after deckhouse, immediately abaft the second funnel, and by the twin 5" mounts.[6]
Construction and commissioning
Helena, the second Navy ship bearing the name of the city of Helena, Montana, was launched on 27 August 1938 by the New York Navy Yard, sponsored by Ms. Elinor Carlyle Gudger, granddaughter of Senator Thomas J. Walsh of Montana, and commissioned on 18 September 1939, Captain Max B. Demott in command.
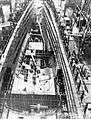 The hull, looking forward to the bow, on 24 June 1937
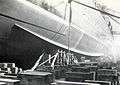 Launch day on 27 August 1938, showing the 5-inch armor belt
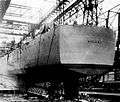 Launch day, showing her squared off stern which allows a recovery area for her float planes
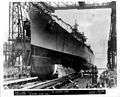 Starting her slide into the water on launch day
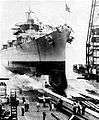 Launching on 27 August 1938
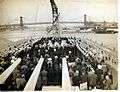 Commissioning ceremony on 18 September 1939

Inter-war period (1939–1940)
Helena departed 14 October 1939 from New York Navy Yard for her sea trials and shakedown cruise. She arrived in Annapolis on 22 December 1939 and departed there on 27 December 1939 for her first voyage to South America.[7]
She stopped in many ports including Norfolk, Virginia from 27 December 1939 to 3 January 1940 and Guantánamo Bay, Cuba from 6–7 January 1940. She crossed the equator on Longitude 40 West on 13 January 1940. Helena visited Buenos Aires, Argentina from 22–28 January 1940. From 19 January to 3 February 1940, she stopped at Montevideo, Uruguay, where her sailors boarded the wreck of the German pocket battleship Admiral Graf Spee. Further stops included Santos, Brazil from 5–10 February 1940, Guantanamo Bay from 12–24 February 1940, and Norfolk from 27 February to 1 March 1940. She arrived back at the Navy Yard in New York on 2 March 1940.[7]
World War II
Attack on Pearl Harbor (7 December 1941)
Helena—assigned to the Pacific Fleet—was at Pearl Harbor on 7 December 1941 when the Japanese attacked. Helena was under the command of Robert Henry English at the time. She was moored at 1010 Dock Navy Yard on the base (southeast) side of the harbor. Outboard was the minelayer Oglala. By chance, Helena was in the berth normally assigned to the battleship Pennsylvania, and thus became a prime target for the Japanese planes.[8]
"Japanese planes are attacking Ford Island, All hands to General Quarters!" was the call over the ship's intercom system at about 0757 hours. A tremendous explosion partly lifted the ship bodily amidships just forward of gun mount number 3 some three minutes into the Japanese attack. Some 20 men were immediately killed. This attack was from one torpedo bomber which launched a torpedo and hit the Helena on the starboard side, just as the crew raced to battle stations. Several Japanese planes, still loaded with torpedoes, overflew the ship to attack the battleships at Ford Island. Reports are inconsistent that some Japanese pilots aborted their attacks on Helena after realizing she was not the USS Pennsylvania.[8]
Helena began to flood and a slight list of no more than five degrees was maintained by counter-flooding. Only one of the two engine rooms and one boiler room were flooded. Wiring to the main and secondary gun batteries was severed, but prompt action by damage control brought the forward diesel generator up within minutes, making power available to all gun mounts, for fire fighting and counter-flooding. With attacking planes flying overhead, the crew began to break out the service ammunition, and by 0801 hours the ship began to fight back by sending up anti-aircraft fire.[8]
There had been a flash fire that caused considerable smoldering and heavy smoke from the explosion. Some sailors were overcome and perished due to this dense smoke. Fire control parties were initially confused because they found no active fires. Crew members responding to the General Quarters alarm closed water-tight doors, hatches and vents. This, with outstanding damage control work, kept Helena afloat. Crew members in the engineering sections had to resort to gas masks due to the smoke. The dead were taken dockside after the first attack was concluded. The wounded initially were taken to sickbay and by 1000 hours many were en route to the Naval Hospital.[8]
The ship's boilers were fired and within an hour the ship was making steam for getting underway. However, leaks due to frame and shaft damage contributed to delays in preparing the ship. By 1140 hours the ship was secured from attempts to get underway when it was finally determined she could not make more than 10 knots for no more than five hours. The ship was moved to dry dock on 8 December. It was found that the ship suffered considerable stress fractures within its engineering piping and tanks. All of these would have to be replaced or repaired stateside at Mare Island Naval Shipyard in California. The ship sailed out of Pearl Harbor a few weeks later and she would not be fully repaired until the end of June 1942.[8]
Thirty-four of Helena's sailors were killed and 69 were wounded during the attack at Pearl Harbor.[8] "There was guys on the docks stacked up like cordwood," recalled sailor Bill Sunderland.[9]
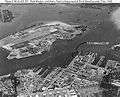 Location of Helena on 7 December 1941 within Pearl Harbor
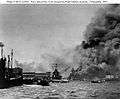 Helena in the center middle distance listing slightly from a torpedo hit. In the foreground is the capsized minelayer Oglala.
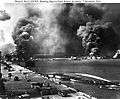 View from Pier 1010, looking toward the Navy Yard's dry docks, USS Nevada burning at right. In the foreground is the capsized Oglala, with Helena further down the pier, at left.
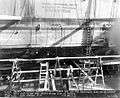 Helena in drydock at Pearl Harbor for repairs, 13 December 1941
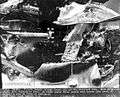 Closeup of torpedo damage to Helena, 14 December 1941
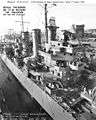 Helena at Mare Island Naval Shipyard on June 27, 1942 completing repairs
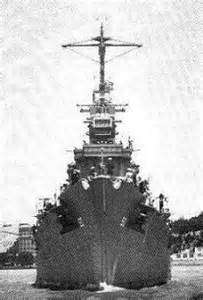
- Bow on view of Helena leaving Mare Island in 1942
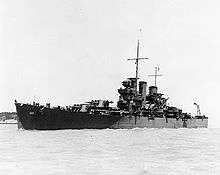 Helena off Mare Island, following battle damage repairs and overhaul, 1 July 1942. This image has been retouched to censor radar antennas.
Guadalcanal Campaign (1942)
After preliminary overhaul at Pearl Harbor, Helena steamed to Mare Island Navy Yard in California for permanent repairs. Her forward superstructure was reduced to open space for gun tubs to mount 20mm and 40mm anti-aircraft guns, and advanced radar was installed which greatly aided the crew as they practiced gunnery drills and they were highly proficient. In 1942, she sailed to enter action, escorting a detachment of Seabees and an aircraft carrier rushing planes to the South Pacific. She made two quick dashes from Espiritu Santo to Guadalcanal, where the long and bloody battle for the island was then beginning, and having completed these missions, joined the task force formed around the aircraft carrier Wasp.
This task force steamed in distant support of six transports carrying Marine reinforcements to Guadalcanal. Mid-afternoon on 15 September, Wasp was suddenly hit by three Japanese torpedoes. Almost at once, she became an inferno. Helena stood by to rescue nearly 400 of Wasp's officers and men, whom she took to Espiritu Santo.
Helena's next action was near Rennell Island, again in support of a movement of transports into Guadalcanal. Air attacks from Henderson Field had slowed down the Tokyo Express for several days, so on 11 October the Japanese poured everything they could deliver against the airstrip, hoping to neutralize air operations long enough to bring heavy troop reinforcements during the night. The Japanese fleet closed and by 18:10 was less than 100 mi (160 km) from Savo Island.
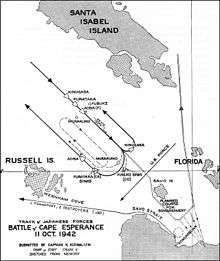
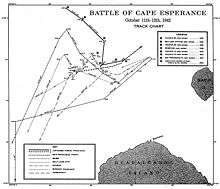
Battle of Cape Esperance (Oct 1942)
To protect the transports carrying the 2,837 men of the 164th Infantry Regiment to Guadalcanal, Vice Admiral Robert L. Ghormley—overall commander of Allied forces in the South Pacific- ordered Task Force 64 (TF 64), consisting of four cruisers (San Francisco, Boise, Salt Lake City, and Helena) and five destroyers (Farenholt, Duncan, Buchanan, McCalla, and Laffey) under U.S. Rear Admiral Norman Scott, to intercept and combat any Japanese ships approaching Guadalcanal and threatening the convoy. Scott conducted one night battle practice with his ships on 8 October, then took station south of Guadalcanal near Rennell Island on 9 October, to await word of any Japanese naval movement toward the southern Solomons.[10]
Although Helena and Boise carried the new, greatly improved SG radar, Scott chose San Francisco as his flagship.[11]
At 22:00, as Scott's ships neared Cape Hunter at the northwest end of Guadalcanal, three of Scott's cruisers launched floatplanes. One crashed on takeoff, but the other two, including one from Helena, patrolled over Savo Island, Guadalcanal, and Ironbottom Sound.
At 22:33, just after passing Cape Esperance, Scott's ships assumed battle formation. The column was led by Farenholt, Duncan, and Laffey, and followed by San Francisco, Boise, Salt Lake City, and Helena. Buchanan and McCalla brought up the rear. The distance between each ship ranged from 500 to 700 yd (460 to 640 m). Visibility was poor because the moon had already set, leaving no ambient light and no visible sea horizon.[12]
At 23:30, Vice Admiral Aritomo Gotō's ships emerged from the last rain squall and began appearing on the radar scopes of Helena and Salt Lake City. The Japanese, however, whose warships were not equipped with radar, remained unaware of Scott's presence.[13]
At 23:32, Helena's radar showed the Japanese warships to be about 27,700 yd (25,300 m) away. At 23:35, Boise's and Duncan's radars also detected Gotō's ships. Between 23:42 and 23:44, Helena and Boise reported their contacts to Scott on San Francisco who mistakenly believed that the two cruisers were actually tracking the three U.S. destroyers that were thrown out of formation during the column turn. Scott radioed Farenholt to ask if the destroyer was attempting to resume its station at the front of the column. Farenholt replied, "Affirmative, coming up on your starboard side," further confirming Scott's belief that the radar contacts were his own destroyers.[14]
By 23:45, Gotō's ships were only 5,000 yd (4,600 m) away from Scott's formation and visible to Helena's and Salt Lake City's lookouts. The U.S. formation at this point was in position to cross the T of the Japanese formation, giving Scott's ships a significant tactical advantage. At 23:46, still assuming that Scott was aware of the rapidly approaching Japanese warships, Helena radioed for permission to open fire, using the general procedure request, "Interrogatory Roger" (meaning, basically, "Are we clear to act?"). Scott answered with, "Roger", only meaning that the message was received, not that he was confirming the request to act. Upon receipt of Scott's "Roger", Helena—thinking they now had permission—opened fire, quickly followed by Boise, Salt Lake City, and to Scott's further surprise, San Francisco.[15]
Gotō's force was taken almost completely by surprise. At 23:43, Aoba's lookouts had sighted Scott's force, but Gotō assumed that they were Rear Admiral Takatsugu Jōjima's ships. Two minutes later, Aoba's lookouts identified the ships as American, but Gotō remained skeptical and directed his ships to flash identification signals. As Aoba's crew executed Gotō's order, the first American salvo smashed into Aoba's superstructure. Aoba was quickly hit by up to 40 shells from Helena, Salt Lake City, San Francisco, Farenholt, and Laffey. The shell hits heavily damaged Aoba's communications systems and demolished two of her main gun turrets as well as her main gun director. Several large-caliber projectiles passed through Aoba's flag bridge without exploding, but the force of their passage killed many men and mortally wounded Gotō.[16]
When firing had ceased in this Battle of Cape Esperance in Ironbottom Sound, Helena helped sink the heavy cruiser Furutaka and destroyer Fubuki. Due to the proficiency of the gunners, Japanese radio announcer Tokyo Rose referred to Helena as the "machine gun ship."
However, conditions and the confusion of battle helped prevent an accurate U.S. assessment of Japanese skills and tactics in naval night fighting. The U.S. was still unaware of the range and power of Japanese torpedoes, the effectiveness of Japanese night optics, and the skilled fighting ability of most Japanese destroyer and cruiser commanders. Incorrectly applying the perceived lessons learned from this battle, U.S. commanders in future naval night battles in the Solomons consistently tried to prove that American naval gunfire was more effective than Japanese torpedo attacks. This belief was severely tested just two months later during the Battle of Tassafaronga. A junior officer on Helena later wrote, "Cape Esperance was a three-sided battle in which chance was the major winner."[17]
On patrol
Helena was next under attack on the night of 20 October while patrolling between Espiritu Santo and San Cristobal. Several torpedoes passed near her but she was not hit.
Naval Battle of Guadalcanal (Nov 1942)
Helena saw the climactic Naval Battle of Guadalcanal from its beginning when she was assigned to escort a supply echelon from Espiritu Santo to Guadalcanal. The ship made rendezvous with the convoy of transports off San Cristobal on 11 November, and brought it safely into Guadalcanal. During the afternoon of 12 November, word came from a coast watcher, "enemy aircraft approaching." Immediately suspending the unloading operation, all ships stood out to form an antiaircraft disposition. When the attack came, superb maneuvering of the force, and its own antiaircraft fire, broke up the first attack but the second damaged two ships. Helena came through without a scratch, and the task group brought down eight enemy planes in the eight-minute action.
As unloading resumed, an increasing stream of reports flowed in from patrolling aircraft. Ominously, the Japanese forces sighted contained no transports, and their intention was thus read as one of being pure offense. Helena—still steaming with Rear Admiral Daniel Callaghan's Support Group—aided in shepherding the transports away from Guadalcanal, then reversed course to Ironbottom Sound. His force comprised two heavy cruisers (San Francisco and Portland), three light cruisers (Helena, Juneau, and Atlanta), and eight destroyers: Cushing, Laffey, Sterett, O'Bannon, Aaron Ward, Barton, Monssen, and Fletcher. Admiral Callaghan commanded from the San Francisco.[18]
Five of Callaghan's ships, including Helena, had the new, far-superior SG radar, but Callaghan's deployment put none of them in the forward part of the column, nor did he choose one for his flagship. Callaghan did not issue a battle plan to his ship commanders for the night of 13 November 1943.[19]
At 0124 hours on the night of 13 November, Helena's radar first located the enemy from the rear center of the allied single column of ships just behind Portland. She had trouble communicating the information to Callaghan because of his inexperience operating the ships as a cohesive naval unit, and there were additional problems with their radio equipment and a further lack of discipline regarding their communications procedures.[20] Another message was sent and received but it did not reach Callaghan in time to process and use given his ignorance of radar and an appreciation of its accuracy—especially the reliability of ranges and bearings so obtained—along with the lack of practice coordinating radar information to visual data.[21]
Admiral Callaghan wasted further time trying to reconcile the ranges and bearing information reported by radar from Helena and other ships with his limited sight picture to no avail, mostly because the radar operators, without the direction of a modern Command Information Center (CIC), were reporting on vessels that were out of sight, and Callaghan was trying to coordinate the battle from the bridge, not a Command Center.[21] (Post battle analysis of this and other early surface actions were to directly lead to the plotting crews and fighting the battle from the modern Command centers before the middle of 1943.)[21]
Several minutes later, both forces visually sighted each other approximately simultaneously, but both Callaghan and Japanese Vice Admiral Hiroaki Abe hesitated on ordering their ships into action. Abe apparently was surprised by the proximity of the U.S. ships and with decks stacked high with high explosive (vs. armor penetrating) munitions could not decide if he should momentarily withdraw to give his battleships time to change from bombardment ammunition to anti-ship ammunition or to continue onward. He decided to continue onward.[21][22] Callaghan apparently intended to attempt to cross the T of the Japanese, as Scott had done at Cape Esperance, but—confused by the incomplete information he was receiving, plus the fact that the Japanese formation consisted of several scattered groups—he gave several confusing orders on ship movements, and overall, just delayed too long in acting at all.[21]
The U.S. ship formation began to fall apart, apparently further delaying Callaghan's order to commence firing as he first tried to ascertain and align his ships' locations.[23] Meanwhile, both forces' formations began to intermingle with each other as the individual ship commanders on both sides anxiously awaited permission to open fire.[21] [24]
At 01:48, Akatsuki and Hiei turned on large searchlights and lit up Atlanta only 3,000 yd (2,700 m) away—almost point-blank range for large naval artillery. Several of the ships on both sides spontaneously opened fire. Realizing that his force was almost surrounded by Japanese ships, Callaghan issued the confusing order: "Odd ships fire to starboard, even ships fire to port"[21][24] (save that no pre-battle planning had assigned any such identity numbers to reference, and the formation was already chaotic).[21] Most of the remaining U.S. ships, including Helena, then opened fire, although several had to quickly change their targets in order to comply with Callaghan's order.[25] As the ships from the two sides intermingled, they battled each other in an utterly confused and chaotic mêlée at close distances where the superior Japanese optics and well-practiced Japanese drill at optically sighted night aiming proved to be deadly effective. Afterward, an officer on Monssen likened it to "a barroom brawl after the lights had been shot out".[26]
At least six of the U.S. ships—including Laffey, O'Bannon, Atlanta, San Francisco, Portland, and Helena—fired at Akatsuki, which drew attention to herself with her illuminated searchlight. Akatsuki was hit repeatedly and blew up and sank within a few minutes.[27]
During the almost point-blank melee and unable to fire her main or secondary batteries at the three U.S. destroyers causing her so much trouble, Hiei instead concentrated on San Francisco which was passing by only 2,500 yd (2,300 m) away.[28] Along with Kirishima, Inazuma, and Ikazuchi, the four ships made repeated hits on San Francisco, disabling her steering control and killing Admiral Callaghan, Captain Cassin Young, and most of the bridge staff. The first few salvos from Hiei and Kirishima consisted of the special fragmentation bombardment shells, which reduced damage to the interior of San Francisco and may have saved her from being sunk outright. Not expecting a ship-to-ship confrontation, it took the crews of the two Imperial battleships several minutes to switch to armor-piercing ammunition. Nevertheless, San Francisco, almost helpless to defend herself, managed to momentarily sail clear of the melee.[29] However, she landed at least one shell in Hiei's steering gear room during the exchange, flooding it with water, shorting out her power steering generators, and severely inhibiting Hiei's steering capability.[30] Helena followed San Francisco to try to protect her from further harm.[31]
Amatsukaze approached San Francisco with the intention of finishing her off. However, while concentrating on San Francisco, Amatsukaze did not notice the approach of Helena which fired several full broadsides at Amatsukaze from close range and knocked her out of the action. The heavily-damaged Amatsukaze escaped under cover of a smoke screen while Helena was distracted by an attack by Asagumo, Murasame, and Samidare.[32][33]
Robert Leckie, a Marine private on Guadalcanal, described the battle:
The star shells rose, terrible and red. Giant tracers flashed across the night in orange arches. ... the sea seemed a sheet of polished obsidian on which the warships seemed to have been dropped and were immobilized, centered amid concentric circles like shock waves that form around a stone dropped in mud.[34]
After nearly 40 minutes of the brutal, close-quarters fighting, the two sides broke contact and ceased fire at 02:26 after Abe and Captain Gilbert Hoover (the captain of Helena and senior surviving U.S. officer at this point) ordered their respective forces to disengage.[35] Admiral Abe had one battleship (Kirishima), one light cruiser (Nagara), and four destroyers (Asagumo, Teruzuki, Yukikaze, and Harusame) with only light damage and four destroyers (Inazuma, Ikazuchi, Murasame, and Samidare) with moderate damage. The U.S. had only one light cruiser (Helena) and one destroyer (Fletcher) that were still capable of effective resistance. Although perhaps unclear to Admiral Abe, the way was clear for him to bombard Henderson Field and finish off the U.S. naval forces in the area, clearing the way for the troops and supplies to be landed safely on Guadalcanal.[36]
However, at this crucial juncture, Abe chose to abandon the mission and depart the area. Several reasons are conjectured as to why he made this decision. Much of the special bombardment ammunition had been expended in the battle. If the bombardment failed to destroy the airfield, then his warships would be vulnerable to CAF air attack at dawn. His own injuries and the deaths of some of his staff from battle action may have affected Abe's judgment. Perhaps he was also unsure as to how many of his or the U.S. ships were still combat-capable because of communication problems with the damaged Hiei. Furthermore, his own ships were scattered and would have taken some time to reassemble for a coordinated resumption of the mission to attack Henderson Field and the remnants of the U.S. warship force. For whatever reason, Abe called for a disengagement and general retreat of his warships, although Yukikaze and Teruzuki remained behind to assist Hiei.[37] Samidare picked up survivors from Yūdachi at 03:00 before joining the other Japanese ships in the retirement northwards.[38]

Daylight found a tragic scene in the grisly slot. The weaker American fleet had achieved the goal at heavy cost. Helena and other U.S. ships had turned back the enemy and prevented the heavy attack that would have been disastrous to the Marine troops ashore.
The U.S. ships Portland, San Francisco, Aaron Ward, and Sterett were eventually able to make it back to rear-area ports for repairs. Atlanta, however, sank near Guadalcanal at 20:00 on 13 November.[39] Departing from the Solomon Islands area with San Francisco, Helena, Sterret, and O'Bannon later that day, Juneau was torpedoed and sunk by Japanese submarine I-26 (9°11′10″S 159°53′42″E / 9.18611°S 159.89500°ECoordinates: 9°11′10″S 159°53′42″E / 9.18611°S 159.89500°E).
Now the senior American officer in the task force because of the death of the task force commander Callaghan in action, Helena's skipper — Captain Gilbert Hoover — commanded the task force's retirement to Espiritu Santo from the battle area. On the way, Juneau was torpedoed and sunk by submarine. Despite observed survivors, Captain Hoover assessed that the task force lacked the means to conduct a search and rescue in its current location and condition, the battle leaving two ships with antisubmarine capacity on hand (one heavily damaged) and other ships too damaged to remain in the area.
Juneau's 100+ survivors (out of a total complement of 697) were left to fend on their own in the open ocean for eight days before rescue aircraft belatedly arrived. While awaiting rescue, all but ten of Juneau's crew died from their injuries, the elements, or shark attacks. The dead included the five Sullivan brothers. For this inaction of rescue, Halsey removed Hoover from command of Helena, which he later regretted as a grievous mistake, writing in his memoirs that "Hoover's decision was in the best interests of victory".[40]
Helmsman view
From the Memoirs of George Albert DeLong, helmsman of Helena when Juneau was sunk.[41]
My assignment was on the bridge in the pilot house as helmsman. While steering the ship I had the opportunity to glance out the port holes and I saw the condition of the San Francisco and the Juneau. I remember commenting to one of the men in the pilot house that the San Francisco looked so beat up that she would be lucky to make it back to Espiritu Santo, but that the Juneau, while she was down by the bow, still looked seaworthy enough to make it back.
Shortly thereafter, however, Lt. Comdr. Carpenter, the ship's navigator, who seldom left the bridge, shouted, "Hard right rudder, DeLong." I spun the rudder over hard right and started singing out the course changes every ten degrees. I glanced out the port hole as the bow swung past the line of sight to the Juneau who had been on our starboard quarter in the formation. The ship was swinging at a rapid speed now and I had no idea what was going on.
Suddenly, Comdr. Carpenter hollered, "Hard left rudder." I reversed the rudder, but the momentum was still carrying the ship to the right. The ship shuddered for several seconds and slowly started to turn left when an immense explosion took place. I glanced out the port hole and all I could see was a huge cloud in the direction the Juneau had been.
By this time the Helena was making good time through the water again and picking up momentum heading straight for the cloud. The wheel was still turned hard left and I had no idea where either the Juneau or the San Francisco were. Total silence reigned in the pilot house and on the wings of the bridge.
Now it was my turn to shout! "Where is she? Where is she? Where is she? I don't want to ram her!" Everyone was out on the wing of the bridge except me and no one other than myself was talking.
Finally, one of the sailors stuck his head in the door and quietly said, "DeLong, she ain't no more." I didn't fully understand what he meant but I decided to ease the rudder lest it bang against the stops and get stuck. I was a little late but in time enough to keep the rudder from jamming. There was a jolt as the rudder hit the stop, but it was light enough so there was no jamming.
The people that had gone outside now filled me in with what had happened. The Juneau didn't sink; she was blown up. Everyone had seen pieces of her flying through the sky. The largest piece was reported as one of her five-inch gun mounts flying over the Helena.
Captain Hoover wisely decided to save all the ships he could and decided not to stop to look for survivors – no one thought there would be any. Even if there were, the subs might still be around and more ships and men could be lost.
Early 1943
Helena later found a measure of revenge when she was assigned to the several bombardments of Japanese positions on New Georgia in January 1943. On 5 January 1943 Lt. "Red" Cochrane, commanding the aft 5" battery on Helena, shot down a Japanese Aichi D3A "Val" dive-bomber with the second of three salvos of VT-fuzed shells, near Guadalcanal. The fuzes were manufactured by the Crosley Corporation and this was the first kill of enemy aircraft. Helena's guns rocked the enemy at Munda and Vila Stanmore, leveling vital supply concentrations and gun emplacements. Continuing on patrol and escort in support of the bitter Guadalcanal operation through February, one of her floatplanes shared in the sinking of the submarine Ro-102 on 11 February.
A U.S. Navy press release dated 23 October 1943, after the sinking of Helena, espoused her war record during this time period.[42]
"The HELENA's war record discloses that she turned the terrific punch of her batteries upon Lunga, Koli and Kokumbona Points on Guadalcanal Island; and on Vila, Munda, Kolombangara, Enogai Inlet and Bairoko Harbor in the New Georgia group, blasting enemy airfields, gun positions and troop areas alike; that she participated in two of the most fiercely-fought surface actions in the Southwest Pacific and came out of them with but minor material damage and the loss of only one man; and that when not wreaking death and destruction upon the enemy, she was busy escorting troops and supply ships and aircraft carriers bearing men, planes, tanks and other implements of war to establish or reinforce the South Pacific bases from which the United States has carried the fight to the Japanese.
On one occasion, Japanese propagandists unwittingly complimented the HELENA's gun crews. Following a bombardment of Kolombangara, the Tokyo radio announced that United States Naval forces employed "a new secret weapon – a 6-inch machine gun." It was a well-deserved tribute to the proficiency of the personnel manning the HELENA's guns."
Battle of Kula Gulf (July 1943)
Shore Bombardment of New Georgia

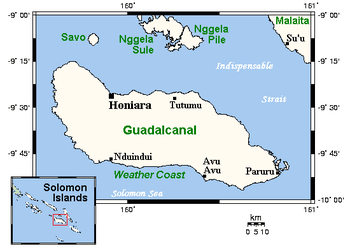
After overhaul in Sydney, Australia, she was back at Espiritu Santo in March to participate in bombardments of New Georgia, soon to be invaded. The first goal on New Georgia proper was Rice Anchorage. In the force escorting the transports carrying the initial landing parties, Helena moved into Kula Gulf just before midnight on 4 July, and shortly after midnight on the 5th, her big guns opened up in her last shore bombardment.
Engagement with Japanese Destroyers
The landing of troops was completed successfully by dawn, but in the afternoon of 5 July, word came that the Tokyo Express was ready to roar down once more and the escort group turned north to meet it. By midnight on 5 July, Helena's group was off the northwest corner of New Georgia, three cruisers and four destroyers composing the group. Racing down to face them were three groups of Japanese destroyers, a total of 10 enemy ships. Four of them peeled off to accomplish their mission of landing troops. By 01:57, the Battle of Kula Gulf had begun, Helena began blasting away with a fire so rapid and intense that the Japanese later announced in all solemnity that she must have been armed with "6 inch machine guns". The gunners fired 2,000 six-inch rounds and 400 smaller rounds during the battle. Ironically, Helena made a perfect target when lit by the flashes of her own guns, which was compounded by the fact that Helena had fired all her flashless powder in the preceding bombardments and was left with standard smokeless powder, which produced immense flames when fired.
Sinking (6 July 1943)
Helena opened fire to port at 0157 hours. About seven minutes after she opened fire at about 0203 hours, Helena was hit by a torpedo. The first Japanese Type 93 torpedo, also called a "Long Lance", could travel at 48–50 knots (56 to 57 Mph) and impacted Helena on the port side just below number one turret (near frame 32), tearing off the bow of the ship. The following explosions by two more torpedoes that hit under the second stack, port side, (near frame 82 and about frame 85) less than two minutes later at about 0205, caused catastrophic and terminal damage. The forward movement of the ship along with the massive structural frame damage caused the ship to twist and jackknife around the damaged area. The ship, still under momentum, went past her own bow and began to flood. The center part twisted to 45 degrees port sinking first. It dragged the rear of the ship down until the stern was vertical. About 22 minutes after the ship was first hit the ship sank at about 0225. In the mean time, the crew abandoned ship by going over the side after cutting free all the surviving life rafts into the ocean. Between the forward momentum of the ship the survivors were scattered over several hundred yards, at night, amidst a raging naval battle. Later currents would separate them even more.[43] The bow would finally sink later the next day.[43]
Rescue of the crew
Helena's history closes with the almost incredible story of what happened to her men in the hours and days that followed.[44]
Within 30 minutes two destroyers, Nicholas and Radford, were picking up survivors of Helena. While many of the cruiser's survivors were picked up before morning, many were not saved until 11 days later.[44]
At daylight approached, the enemy was in range once more, and again destroyers Nicholas and Radford broke off their rescue operations to pursue. Anticipating an air attack, the destroyers withdrew for Tulagi, carrying with them all but about 275 of the survivors.[44]
To those who remained they left four boats, manned by volunteers from the destroyers' crews, who collected those still in the water. Captain Charles Purcell Cecil, Helena's commanding officer, organized a small flotilla of three motor whaleboats, each towing a life raft, carrying 88 men to a small island about 7 miles from Rice Anchorage after a laborious all-day passage. This group was rescued the next morning by destroyers Gwin and Woodworth.[44]
For the second group of nearly 200, the bow of Helena was their life raft, but it was slowly sinking. Disaster was staved off by a Navy PB4Y-1 (B-24) Liberator that dropped lifejackets and four rubber lifeboats. The wounded were placed aboard the lifeboats, while the able-bodied surrounded the boats and did their best to propel themselves toward nearby Kolombangara. But wind and current carried them ever further into enemy waters. Through the torturous day that followed, many of the wounded died. American search planes missed the tragic little fleet, and Kolombangara gradually faded away to leeward. Another night passed, and in the morning the island of Vella Lavella loomed ahead. It seemed the last chance for Helena's men and so they headed for it. By dawn, survivors in all three remaining boats observed land 1 nmi (1.2 mi; 1.9 km) distant and all who were left were safely landed. Two coastwatchers and loyal natives cared for the survivors as best they could, and radioed news of them to Guadalcanal. The 165 remaining crew of Helena then took to the jungle to evade Japanese patrols.[43][44]
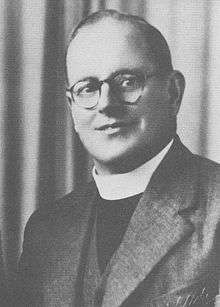
Coastwatcher Henry Josselyn and Robert Firth and Methodist Missionary Reverend A.W.E. Silvester with the natives of Vella LaVella were credited in rounding up the scattered survivors who had come ashore. They were instrumental in keeping the Japanese at bay and providing relief. Reverend Silvester was well remembered by Frank P. Cellozzi, GM2 who wrote the following in 1984.[45]
We were met by Reverend A.E. Sylvestor [A. W. E. Silvester], an Australian Methodist Missionary. He had been on the island for some months. He was a well-organized Coastwatcher and with his native crew of Melanesians, he gave reports of Japanese movements of ships and aircraft in the area. He was familiar with the entire island. His scouts reported all Japanese movements on the island; he was in full command. He reported all his information to the American forces with what means he had. He and the other Coastwatchers throughout these islands were a tremendous asset to the allies in winning the war in the Pacific. They were alone against tremendous odds, they often suffered from lack of food, had little or no means of communication, and always faced capture by the enemy in the Pacific.
Surface vessels were chosen for the final rescue, Nicholas and Radford, augmented by Jenkins and O'Bannon, set off on 15 July to sail further up the Slot than ever before, screening the movement of two destroyer-transports and four other destroyers. During the night of 16 July, the rescue force brought out the 165 Helena men, along with 16 Chinese who had been in hiding on the island. Of Helena's nearly 900 men, 168 had perished. Later during the investigation of the sinking, the officer and crew of Helena were commended for their actions.[43][44]
Aftermath
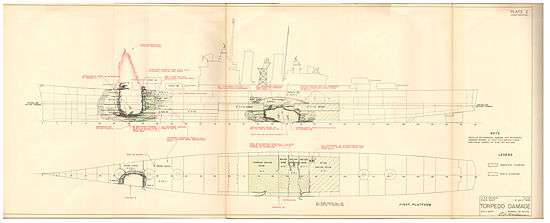
From the War Damage report conducted after the sinking and by recommendations of the commanding officer of Helena, the following items are quoted.[43]
Page 13 - Finally, a word should be said for the inestimable value of the Type JR-1 relay operated battle lanterns, which were the only source of illumination after the ship's lighting system failed. The confidence that these beams of light along the exit routes maintained in the men contributed largely to the lack of panic and contributed to the saving of many lives. There were 110 of these lanterns installed throughout the ship in locations best suited for just such an emergency. This is twice the number shown in the ship's machinery allowance book. The excess was obtained through an error, but in view of this experience it is believed that the quantity of 110 is the acceptable minimum for cruisers. It is recommended that the allowance of this item for cruisers be increased accordingly and that it be increased proportionately for other types of ships.[43]
Page 20 - D. Damage Control Notes
33. In the face of the damage HELENA received, there was little which the Damage Control and Engineering Organizations could do to control the situation. Nonetheless, it is evident that the crew was thoroughly indoctrinated in damage control. In paragraph 3 of Section III, it will be noted that all personnel in the magazines on the second platform aft of bulkhead 39 were successfully evacuated - necessarily in a very short time. The Repair I party, located in A-210-L on the second deck, was largely responsible for this. They successfully coached the magazine crews and other personnel on the second platform up through turret III to the main deck.[43]
34. Again, the evacuation of personnel from the forward boiler operating station and the after engine room was a notable achievement. These personnel successfully made their way from these low spaces to the main deck via the third and second decks as the ship was sinking and as water followed close on their heels during their escape.[43]
35. Both of these incidents are illustrative of the high degree of coordination which existed among personnel of all departments.[43]
Awards
Helena was the first ship to receive the Navy Unit Commendation. This for her actions in the Battles of Cape Esperance, Guadalcanal, and Kula Gulf which were named in the citation.
Helena also earned the Asiatic-Pacific Area Campaign Medal with seven battle stars. these were for action at:
- PEARL HARBOR on 7 December 1941
- CAPE ESPERANCE on 11–12 October 1942
- CAPTURE AND DEFENSE OF GUADACANAL on 4–12 November 1942 and 5 January 1943
- GUADALCANAL (Third Savo) on 12–15 November 1942
- ANTI-SUBMARINE ASSESSMENT on 11 February 1943
- CONSOLIDATION OF SOLOMON ISLANDS on 12–13 May 1943
- NEW GEORGIA GROUP OPERATION: 4–5 July 1943
- KULA GULF ACTION on 5–6 July 1943
Helena was also entitled to the American Defense Service Medal with "FLEET" clasp and the World War II Victory Medal.
Memorial
A memorial to Helena (CL-50 & CA-75) is located in Helena, Montana.
A time line with pictures and comments of Helena's life is at the NavSource Online: Cruiser Photo Archive - USS HELENA (CL 50).
Commanding Officers
The commanding officers of the USS Helena (CL50) were:[46]
| Name | Rank | Final Rank | Dates | Notes |
|---|---|---|---|---|
| Johnston, Donald Hendry | LCDR | Before 09/18/1939 | Until Capt. DeMott arrived | |
| DeMott, Max Burke | CAPT | 09/18/1939 - 07/14/1941 | ||
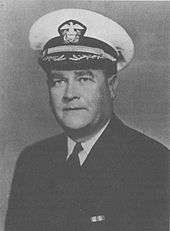
| English Jr., Robert Henry | CAPT | RADM | 07/14/1941 - 03/06/1942 | |
| Linke, Gerald D. | CDR | CAPT | 03/06/1942 - 03/29/1942 | |
| Read, Oliver Middleton | CDR | 03/29/1942 - 09/25/1942 | ||
| Hoover, Gilbert Corwin | CAPT | 09/25/1942 - 11/23/1942 | ||
| Cecil, Charles Purcell | CAPT | RADM | 11/23/1942 - 07/06/1943 | Survived sinking |
Remains recovered
In June 2006 on Ranongga Island, human remains were found, including a U.S. Navy dog tag. The island resident contacted authorities who contacted Defense Prisoner of War/Missing Personnel Office. In September 2006 a team from Joint POW/MIA Accounting Command were able to recover the remains. By September 2007, after forensic testing, the remains were identified as Seaman 1st Class, General Preston Douglas.[47] On 26 January 2008 he was laid to his final rest next to his sister. Reginia (Douglas) Collins died on 11 November 2007 shortly after being notified that her brother was coming home. Both are buried in Gollihon Cemetery in Sneedville, Hancock County, Tennessee.
His brother Walter Garfield Douglas was also present on Helena when she sank. He was working in another portion of the ship and he survived the war.[47]
Video
- Video of USS Helena survivors at the funeral of Irwin Edwards, who succumbed to his wounds after being rescued. Admiral Walden L. Ainsworth, with cap, shakes the hands of the survivors. This includes Commander Charles L. Carpenter, with mustache, senior rescued officer. Aboard the USS Honolulu, dated 7 Jul 1943.
- Commander Charles L. Carpenter, center with mustache, at the head of the gangplank as USS Helena survivors are transferred to another ship. Dated 7 Jul 1943.
Gallery
 USS Helena (CL-50) anchored in President Roads, Boston, Massachusetts, 15 June 1940.
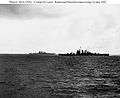 Central Solomons Campaign, 1943. Light cruisers maneuvering off Espiritu Santo, New Hebrides, during exercises on 20 June 1943, Ships are USS Saint Louis (CL-49), at left, USS Helena (CL-50), at right.
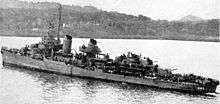 USS Radford (DD-446) returning to Tulagi with some survivors of the USS Helena (CL-50) on July 6, 1943.
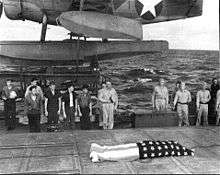 USS Helena (CL-50) survivors after their ship was sunk on July 6, 1943 hold a funeral service for Irwin Edwards. Edwards died of his wounds after being rescued. Admiral Walden L. Ainsworth, cap off center, provided a eulogy.
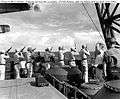 Marines aboard USS Honolulu (CL-48) fire a salute during funeral services for Irwin Edwards, a casualty from the sunken USS Helena (CL-50), following the Battle of Kula Gulf. Note Chaplain at right and audio equipment in left center, atop the cruiser's hangar cover.
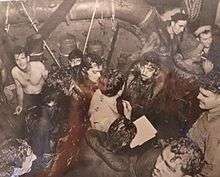 Aboard the USS Nicholas (DD-449) after being rescued, Commander Charles L. Carpenter the Helena's navigator (center right, with moustache), still drenched in fuel oil after being rescued with other crew members. The USS Helena (CL-50) was sunk in the Kula Gulf, Solomon Islands about 0225 hours (2:25 AM) on July 6, 1943. CLC Family image.
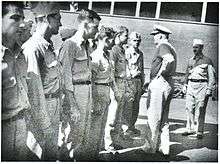 USS Helena survivors greeted by Admiral Walden Ainsworth, with cap, about 7 Jul 1943. Commander Charles L. Carpenter, senior officer of the first group of survivors rescued, is behind the Admiral.
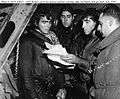 Wet and oil-covered survivors of USS Helena (CL-50) go over papers after their rescue from the waters of the Central Solomon Islands, 6 July 1943. Photographed on board another U.S. Navy warship, possibly USS Nicholas (DD-449). The Helena had been sunk by Japanese torpedoes on the previous night.
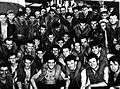 USS Helena (CL-50) survivors after their ship was sunk on July 6, 1943.
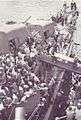 USS Helena (CL-50) survivors after their ship was sunk on July 6, 1943. Transfer of injured first from USS Nicholas (DD-449) to the USS Honolulu (CL-48).
 USS Helena (CL-50) survivors after their ship was sunk on July 6, 1943.
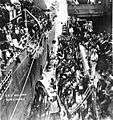 USS Helena (CL-50) survivors after their ship was sunk on July 6, 1943.
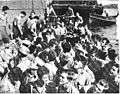 USS Helena (CL-50) survivors after their ship was sunk on July 6, 1943.
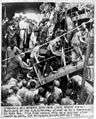 USS Helena (CL-50) survivors after their ship was sunk on July 6, 1943 being transferred after arriving in Tulagi.
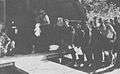 Survivors from the USS Helena, sunk during the Battle of Kula Gulf on July 6, 1943, line-up for new clothes and gear on Tulagi after their rescue from Vella Lavella.
Notes
- ↑ "Ships' Data, U. S. Naval Vessels". US Naval Department. 1 July 1935. pp. 24–31. Retrieved 20 October 2015.
- ↑ "Ships' Data, U. S. Naval Vessels". US Naval Department. 1 January 1938. pp. 24–31. Retrieved 21 November 2015.
- ↑ Rickard, J (18 June 2015). "USS Helena (CL-50)". Historyofwar.org. Retrieved 25 October 2015.
- ↑ "Helena II (CL-50)". Naval History and Heritage Command. 15 July 2015. Retrieved 19 November 2015.
- ↑ Whitley pp.248–249
- 1 2 Global Security (2009). "St. Louis class cruiser". Global Security.org. Retrieved 3 June 2014.
- 1 2 Kermit Bonner (1996). Final Voyages. Turner Publishing Company. ISBN 1-56311-289-2. Retrieved 2008-02-10.
- 1 2 3 4 5 6 US Navy (1942). "Personal accounts of various non-division officers of Engineer's Force of events of December 7, 1941". Mare Island Naval Ship Yard General Correspondence Files, 1941-47. National Archives & Records Administration, San Bruno (San Francisco) Branch Record Group 181. Retrieved 3 June 2014.
- ↑ Glynn, Gary, Montana's Home Front During World War II, 2nd ed. Big Elk Books. 2011. ISBN 9780983839002
- ↑ Cook, Cape Esperance, p. 16 and 19–20; Frank, Guadalcanal, p. 295–297; Morison, Struggle for Guadalcanal, p. 148–149; and Dull, Imperial Japanese Navy, p. 225. Since not all of the Task Force 64 warships were available, Scott's force was designated as Task Group 64.2. The U.S. destroyers were from Squadron 12, commanded by Captain Robert G. Tobin in Farenholt.
- ↑ Frank, Guadalcanal, pp.293–294; Cook, Cape Esperance, p.22–23, 25–27, and 37; and Morison, Struggle for Guadalcanal, pp.149.
- ↑ Cook, Cape Esperance, pp.20, 26, and 36; Frank, Guadalcanal, p.298; Morison, Struggle for Guadalcanal, pp.152–153.
- ↑ Frank, Guadalcanal, p.299; Cook, Cape Esperance, pp.58–60; Morison, Struggle for Guadalcanal, pp.152–153.
- ↑ Frank, Guadalcanal, p. 299–301, Cook, Cape Esperance, p. 42–43, 45–47, 51–53, Morison, Struggle for Guadalcanal, p. 154–156.
- ↑ Cook, Cape Esperance, p. 42–50, 53–56, 71, Frank, Guadalcanal, p. 300–301, D'Albas, Death of a Navy, p. 184, Dull, Imperial Japanese Navy, p. 227–228, and Morison, Struggle for Guadalcanal, p. 156–157.
- ↑ Frank, Guadalcanal, p. 301–302, Cook, Cape Esperance, p. 68–70, 83–84, Dull, Imperial Japanese Navy, p. 226–227, D'Albas, Death of a Navy, p. 186, and Morison, Struggle for Guadalcanal, p. 158–160.
- ↑ Cook, Cape Esperance, p. 59, 147–151; Frank, Guadalcanal, p. 310–312; Morison, Struggle for Guadalcanal, p. 170–171.
- ↑ Hammel, Guadalcanal: Decision at Sea, p. 99–107.
- ↑ Kilpatrick, Naval Night Battles, p. 85; Morison, Struggle for Guadalcanal, p. 237; Hammel, Guadalcanal: Decision at Sea, p. 106–108. In Callaghan's column the distance between the destroyers and cruisers was 800 yd (730 m); between cruisers 700 yd (640 m); between destroyers 500 yd (460 m)
- ↑ Kilpatrick, Naval Night Battles, p. 86–89; Hammel, Guadalcanal: Decision at Sea, p. 124–126; Morison, Struggle for Guadalcanal, p. 239–240.
- 1 2 3 4 5 6 7 8 Frank, Guadalcanal, p. 438.
- ↑ Hara, Japanese Destroyer Captain, p. 140.
- ↑ Kilpatrick, Naval Night Battles, p. 89–90; Morison, Struggle for Guadalcanal, p. 239–242; Hammel, Guadalcanal: Decision at Sea, p. 129.
- 1 2 Frank, Guadalcanal, p. 439.
- ↑ Kilpatrick, Naval Night Battles, p. 90–91; Hammel, Guadalcanal: Decision at Sea, p. 132–137; Morison, Struggle for Guadalcanal, p. 242–243.
- ↑ Frank, Guadalcanal, p. 441.
- ↑ Morison, Struggle for Guadalcanal, p. 242–243; Hammel, Guadalcanal: Decision at Sea, p. 137–183, and Frank, Guadalcanal, p. 449. Only eight crewmen out of a total complement of 197 (combinedfleet.com) survived the sinking of Akatsuki and were later captured by U.S. forces. One of Akatsuki's survivors, Shinya Michiharu, wrote a book called The Path From Guadalcanal which states that his ship did not fire a torpedo before sinking. Michiharu's book has not been translated into English from Japanese.
- ↑ Frank, Guadalcanal, p. 444.
- ↑ Hammel, Guadalcanal: Decision at Sea, p. 160–171; Morison, Struggle for Guadalcanal, p. 247.
- ↑ combinedfleet.com
- ↑ Hammel, Guadalcanal: Decision at Sea, p. 234.
- ↑ Frank, Guadalcanal, p. 449.
- ↑ Hara, Japanese Destroyer Captain, p. 149.
- ↑ Frank, Guadalcanal p. 451, quoting Leckie's Helmet for my Pillow.
- ↑ Frank, Guadalcanal, p. 451.
- ↑ Frank, Guadalcanal, p. 449–450.
- ↑ Hara, Japanese Destroyer Captain, p. 153.
- ↑ Frank, Guadalcanal, p. 452.
- ↑ Hammel, Guadalcanal: Decision at Sea, p. 274–275.
- ↑ Kurzman, Left to Die, Frank, Guadalcanal, p. 456; Morison, Struggle for Guadalcanal, p. 257; Kilpatrick, Naval Night Battles, p. 101–103.
- ↑ George Albert DeLong (2009). "Memoirs of George Albert DeLong (26th June 1922 - 22nd March 2002),". Jane's Oceania Home. Retrieved 2 June 2014.
- ↑ Navy Department Bureau of Naval Personnel (1944). "US Navy Letter - information concerning the loss of the USS HELENA (CL 5O)". US Navy Press release. USS Helena veterans page. Retrieved 18 June 2014.
- 1 2 3 4 5 6 7 8 9 Buships War Damage Report 1944 (1943). "U. S. S. HELENA (CL50) LOSS IN ACTION KULA GULF, SOLOMON ISLANDS 6 JULY, 1943". HELENA. WAR DAMAGE REPORT No. 43. HyperWar. Retrieved 29 May 2014.
- 1 2 3 4 5 6 Domagalski, John J. (2012). Sunk in Kula Gulf: The Final Voyage of the USS Helena and the Incredible Story of Her Survivors in World War II. Potomac Books Inc. ISBN 1597978396. Retrieved 11 June 2014.
- ↑ Frank P. Cellozzi (1984). "THE DEATH OF A LADY: THE AFTERMATH OF THE SINKING OF THE LIGHT CRUISER U.S.S. HELENA CL5O". USS Helena Web Page. Retrieved 18 June 2014.
- ↑ Paul Yamall (2005). "USS HELENA (CL 50)". Cruiser Photo Archive. NavSource Online. Retrieved 29 May 2014.
- 1 2 Douglas Archives (2013). "Seaman 1st Class General P. Douglas, U.S. Navy, k1943". The Douglas Archives. The Douglas Archives. Retrieved 29 May 2014.
- This article incorporates text from the public domain Dictionary of American Naval Fighting Ships. The entry can be found here.
| Wikimedia Commons has media related to Battle of Kula Gulf. |
| Wikimedia Commons has media related to USS Helena (CL-50). |
References
- Anderson, Paul O., CDR USNR (1944). One damned fight after another": The combat record of the USS Helena from Dec. 7, 1941 to July 6, 1943. ASIN B0007KABJS. OCLC 41758996.
- Brown, David (1990). Warship Losses of World War Two. Naval Institute Press. ISBN 1-55750-914-X.
- Cook, Charles O. (1992). The Battle of Cape Esperance: Encounter at Guadalcanal (Reissue ed.). Naval Institute Press. ISBN 1-55750-126-2.
- Crenshaw, Russell Sydnor (1998). South Pacific Destroyer: The Battle for the Solomons from Savo Island to Vella Gulf. Naval Institute Press. ISBN 1-55750-136-X.
- Domagalski, John J. (2012). Sunk in Kula Gulf: The Final Voyage of the USS Helena and the Incredible Story of Her Survivors in World War II. Potomac Books Inc. ISBN 1597978396.
- Dull, Paul S. (1978). A Battle History of the Imperial Japanese Navy, 1941–1945. Naval Institute Press. ISBN 0-87021-097-1.
- Evans, David C. (Editor); Raizo Tanaka (1986). "The Struggle for Guadalcanal". The Japanese Navy in World War II: In the Words of Former Japanese Naval Officers (2nd ed.). Annapolis, Maryland: Naval Institute Press. ISBN 0-87021-316-4.
- Frank, Richard B. (1990). Guadalcanal: The Definitive Account of the Landmark Battle. New York: Penguin Group. ISBN 0-14-016561-4.
- Griffith, Samuel B. (1963). The Battle for Guadalcanal. Champaign, Illinois, USA: University of Illinois Press. ISBN 0-252-06891-2.
- Hammel, Eric (1988). Guadalcanal: Decision at Sea: The Naval Battle of Guadalcanal, November 13–15, 1942. (CA): Pacifica Press. ISBN 0-517-56952-3.
- Hara, Tameichi (1961). Japanese Destroyer Captain. New York & Toronto: Ballantine Books. ISBN 0-345-27894-1.
- Hara, Tameichi (1961). "Part Three, The "Tokyo Express"". Japanese Destroyer Captain. New York & Toronto: Ballantine Books. ISBN 0-345-27894-1.- Firsthand account of the first engagement of the battle by the captain of the Japanese destroyer Amatsukaze.
- Holbrook, Heber A. (1997). The loss of the USS Juneau (CL-52) and the relief of Captain Gilbert C. Hoover, commanding officer of the USS Helena (CL-50) (Callaghan-Scott naval historical monograph). Pacific Ship and Shore-Books. ASIN B0006QS91A.
- Jameson, Colin G. (1944). "The Battle of Guadalcanal, 11–15 November 1942". Publications Branch, Office of Naval Intelligence, United States Navy (Somewhat inaccurate on the details of actual damage done to and actions by Japanese ships). Retrieved 2006-04-08.
- Jersey, Stanley Coleman. Hell's Islands: The Untold Story of Guadalcanal. College Station, Texas: Texas A&M University Press. ISBN 1-58544-616-5.
- Kilpatrick, C. W. (1987). Naval Night Battles of the Solomons. Exposition Press. ISBN 0-682-40333-4.
- Kurzman, Dan (1994). Left to Die: The Tragedy of the USS Juneau. New York: Pocket Books. ISBN 0-671-74874-2.
- Lippman, David H. (2006). "Second Naval Battle of Guadalcanal: Turning Point in the Pacific War". The HistoryNet.com. World War II magazine. Retrieved 2006-11-26.
- Lundstrom, John B. (2005). First Team And the Guadalcanal Campaign: Naval Fighter Combat from August to November 1942 (New ed.). Naval Institute Press. ISBN 1-59114-472-8.
- Morison, Samuel Eliot (1958). "The Naval Battle of Guadalcanal, 12–15 November 1942". The Struggle for Guadalcanal, August 1942 – February 1943, vol. 5 of History of United States Naval Operations in World War II. Boston: Little, Brown and Company. ISBN 0-316-58305-7.
- Whitley, M J (1995). Cruisers of World War Two: An International Encyclopedia. London: Arms and Armour Press. ISBN 1-85409-225-1.
External links
- Images taken by Ensign Richard D. Sampson, USN, on 2 February 1940 for an intelligence report prepared by USS Helena (CL-50) during her shakedown cruise to South America. More images here.
- Uboat.net
- Photo gallery of USS Helena at NavSource Naval History
- Naval History and Heritage Command
- USSHelena.org
- USS Helena, Report of Pearl Harbor Attack dated 14 December 1941
- Pearl Harbor Account by ship's personnel
- Naval Warfare - USS Helena (CL-50)
- USS St. Louis (CL-49) - 7 of 14 Sinking of the Helena described.
- War Damage Report on the sinking of the USS Helena CL-50.
- US Navy Communiqués to the men of the USS Helena in 1943
- USS Helena (CL-50) Web Page A tribute to the ship and those who served on her.
| |
| |
| Shipwrecks |
|
|---|---|
| Other incidents |
|
1942 June 1943 | |