Battle of the Tennis Court
| Battle of the Tennis Court | |||||||
|---|---|---|---|---|---|---|---|
| Part of Battle of Kohima | |||||||
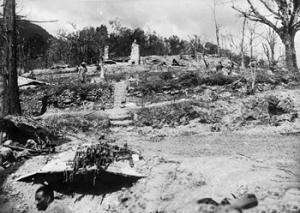 The tennis court and terraces of the District Commissioner's bungalow in Kohima. | |||||||
| |||||||
| Belligerents | |||||||
|
|
| ||||||
| Commanders and leaders | |||||||
|
|
| ||||||
| Strength | |||||||
|
161st Indian Infantry Brigade British 6th Infantry Brigade | Japanese 31st Infantry Division | ||||||
| Casualties and losses | |||||||
| 4,604 | 5,764 | ||||||

The Battle of the Tennis Court was part of the Battle of Kohima in North East India from April 4 – June 22, 1944 during the Burma Campaign of the Second World War. The Japanese advance into India was halted at Kohima in April 1944 and Garrison Hill, on a long wooded ridge on a high ridge west of the village, was the scene of perhaps the most bitter fighting of the whole Burma campaign when a small Commonwealth force held out against repeated attacks by a Japanese Division. The fiercest hand-to-hand fighting took place in the garden of the Deputy Commissioner's bungalow, around the Tennis Court.[1]
Prelude
Kohima Ridge was about a mile long and about 400 yards wide, with a series of hills and gullies that ran alongside the road from Imphal to Dimapur. The steep slopes along the road made the ridge a formidable target for attackers, but it was a narrow space from which to repel an enemy attacking in strength.[2] By April 6 the British, Nepalese and Indian soldiers of Kohima Garrison had been surrounded on the Kohima ridge.[3] As the siege began the Kohima Ridge was defended to the south (facing Imphal) by the 1st Assam Regiment on Jail Hill. The centre ground of the ridge was mainly defended by 4th Battalion, Queen's Own Royal West Kent Regiment. The North West of the Ridge, known as Hospital Spur, was defended by the 3rd Assam Rifles who were facing the road to Dimapur. The North East of the Ridge on a sharp corner in the road was where the Deputy Commissioner (DC) Charles Pawsey's Bungalow and Tennis Court was situated. This was initially guarded by a composite group of soldiers,[3] thought to be British and Gurkha troops from the local Reinforcement Depot.[4]
Battle
The Japanese launched a series of attacks into the north-east region of the defences on April 8, including two attacks on the DC's Bungalow area. The Japanese suffered massive losses, but poured in reinforcements to prepare for another attack. Some Allied soldiers manned a Bren gun to cover the withdrawal from the DC's Bungalow to the other side of the asphalt tennis court 12m higher up the hill. They held on to the last round but were then overrun, bayoneted and shot.[5] At this stage the Battle of the Tennis Court could be said to have begun with the area being rapidly reinforced by A Company of the 4th Battalion, Queen's Own Royal West Kent Regiment.[6]
During April 9 and before dawn on April 10 the Japanese 58 Regiment attacked the Allied defenders of the Tennis Court area almost every 30 minutes.[7] Major Tom Kenyon, Officer Commanding (OC) A Company of the 4th Royal West Kents, commanded the British, Indian and Gurkha defenders who had now dug weapon pits and trenches on the western edge of the tennis court.[8] During April 10 these defences and the overhead cover saved many lives as artillery shells landed on the Allied positions. The forward trenches ran out of ammunition on several occasions but were repeatedly resupplied by Sergeant Williams who was awarded a Military Medal for his bravery.[9]
The decision was made on April 12 to relieve the defenders of the Tennis Court with B Company of the 4th Royal West Kents commanded by Major John Winstanley.[10] During B Company's first night defending the Tennis Court, the Japanese forces attacked silently wearing plimsoll shoes instead of boots. They nearly overran the British forward positions with one of the platoon commanders, Lieutenant Tom Hogg, surviving a bayonet attack before firing all 25 rounds from his weapon (probably a Bren light machine gun) killing his assailant.[11]
On April 13, the troops defending near the DC's bungalow and the tennis court came under increasingly heavy artillery and mortar fire, and had to repel frequent infantry assaults. This area was the scene of some of the hardest, closest and grimmest fighting, with grenades being hurled across the tennis court at point-blank range. But on April 14 the Japanese did not launch an attack and on the 15th the British and Indian troops on Kohima ridge heard that the British 2nd Infantry Division was attacking along the Dimapur-Kohima road and had broken through Japanese roadblocks.
On April 17, the Japanese tried one last time to take the ridge. They successfully captured Field Supply Depot (FSD) Hill and Kuki Piquet. But on the morning of April 18, British artillery opened up from the west against the Japanese positions, which stopped the Japanese attacks. Elements of the British 2nd Division, the 161st Indian Brigade and tanks from XXXIII Corps pushed into the area north-west of Garrison Hill and forced the Japanese from their positions. The road between Dimapur and Kohima had been opened, and the siege was lifted.
Part of the Allied force relieving the siege was the 1/1st Punjab Regiment of the 161st Indian Brigade. By the evening of April 18, D Company of 1/1st Punjab Regiment, commanded by Major Gavin Dunnett, were facing the Japanese forces in the Tennis Court area. They were attacked almost immediately by the Japanese 58 Regiment, a battle in which a South East Asia Command Public Relations officer later reported "a grenade match was played across the bungalow's tennis courts". The 1/1st Punjab Regiment took 22 casualties and lost ground, only to retake it again the following day (April 19) during which Jemadar Mohammed Rafiq was awarded the Military Cross for leading his platoon against Japanese bunkers.[12] The 1/1st Punjab Regiment seem to have moved rearwards on April 21, having suffered 120 casualties, to be replaced by C Company of the 1st Battalion, Royal Berkshire Regiment,[13] part of the 6th Brigade of the British 2nd Division, who were themselves relieved by D Company of the same battalion on April 23.[14]
The Japanese who had been fighting to capture Kohima did not retreat at once, many of them stayed in the positions which they had captured and fought tenaciously for several more weeks. It is not entirely clear when the battle for the Tennis Court was won, however it seems that tanks operating from the road supported an infantry attack that captured the Tennis Court area on 10 May 1944.[15] By the morning of May 13, most of the positions on the Kohima ridge had been re-taken by the British and Indian forces. On that day the DC's bungalow was finally recaptured by the 2nd Battalion, Dorset Regiment supported by Grant tanks firing from the Tennis Court.[16] The lead tank was driven by Sergeant Waterhouse of 149th Regiment Royal Armoured Corps (149 RAC), firing his 75mm main armament into Japanese bunkers at no more than 20 yards range. This tank was supported by two platoons of the Dorsets commanded by Sergeants Given and Cook.[17] This Allied breakthrough that ended the Battle of the Tennis Court is depicted in a 1982 painting by Terence Cuneo which is displayed in the Kohima Museum in Imphal Barracks, York.[18]
The fighting within the 6th Brigade's area was documented by Major Boshell, who commanded 'B' Company of the 1st Royal Berkshires, in the 6th Infantry Brigade, British 2nd Division:
| “ | To begin with I took over an area overlooking the Tennis Court... The lie of the land made impossible to move by day because of Japanese snipers. We were in Kohima for three weeks. We were attacked every single night... They came in waves, it was like a pigeon shoot. Most nights they overran part of the battalion position, so we had to mount counter-attacks... Water was short and restricted to about one pint per man per day. So we stopped shaving. Air supply was the key, but the steep terrain and narrow ridges meant that some of the drops went to the Japs. My company went into Kohima over 100 strong and came out at about 60.[19] | ” |
Aftermath
Around May 15 the Japanese 31st Division began to withdraw and the fresh British and Indian troops from XXXIII Corps began to reinforce and relieve members of the 2nd Division and 33rd and 161st Indian Brigades. The Battle of the Tennis Court was over and troops of the British Fourteenth Army began an advance, with the relief of Imphal, which would continue until Burma had been recaptured.
This battle was ultimately to prove to be the turning point of the Battle of Kohima which was the turning point of the Burma Campaign. Earl Louis Mountbatten, the Supreme Allied Commander in the theatre, described Kohima as
| “ | probably one of the greatest battles in history... in effect the Battle of Burma... naked unparalleled heroism... the British/Indian Thermopylae.[20] | ” |
Notes
- ↑ CWGC staff 2015.
- ↑ Keane 2010, p. 226.
- 1 2 Keane 2010, p. 232.
- ↑ Colvin 2012, p. 91.
- ↑ Street 2003, p. 65.
- ↑ Lyman 2010, p. 47.
- ↑ Colvin 2012, p. 99.
- ↑ Colvin 2012, p. 100-101.
- ↑ Street 2003, p. 75-76.
- ↑ Colvin 2012, p. 104.
- ↑ Street 2003, p. 83.
- ↑ Edwards 2009, pp. 192-195.
- ↑ Edwards 2009, p. 208.
- ↑ Edwards 2009, p. 219.
- ↑ Lyman 2010, p. 68.
- ↑ Lyman 2010, p. 11.
- ↑ Colvin 2012, p. 200.
- ↑ Your Paintings team 2008.
- ↑ Anonymous 2004, p. 6.
- ↑ Anonymous 2004, p. 3.
References
- Anonymous (April 2004), The Battle of Kohima, North East India 4 April – 22 June 1944, British MOD 2nd World War Commemorative Booklets, retrieved 25 December 2010 External link in
|publisher=(help) - Colvin, John (2012), Not Ordinary Men: The Story of the Battle of Kohima, Barnsley: Pen and Sword, p. 200, ISBN 1-84884-871-4
- CWGC staff (2015), Commonwealth War Graves Commission Kohima Cemetery, CWGC (UK), retrieved 18 January 2015
- Edwards, Leslie (2009), Kohima: The Furthest Battle, Stroud: The History Press, pp. 192–195, 208, 219, ISBN 978-1-86227-488-4
- Keane, Fergal (2010), Road of Bones: The Siege of Kohima 1944, London: HarperPress, pp. 226, 232, ISBN 978-0-00-713240-9
- Lyman, Robert (2010), Kohima 1944: The battle that saved India, Oxford: Osprey, pp. 11, 47, 68, ISBN 978-1-84603-939-3
- Street, Robert (2003), The Siege of Kohima: The Battle for Burma, Grantham: Barny Books, pp. 65, 75–76, 83, ISBN 1-903172-35-7
- Your Paintings team (22 September 2008), The Battle of Kohima, April 1944, BBC and the Public Catalogue Foundation, retrieved 18 January 2015
Further reading
- Graham, Gordon (2005), The Trees Are All Young on Garrison Hill, Marlow, Buckinghamshire: The Kohima Educational Trust, ISBN 0-9552687-0-2
- Lowry, Michael (2003), Fighting Through to Kohima: A Memoir of War in India and Burma, Leo Cooper
External links
- "The Kohima Museum".
- "The Kohima Educational Trust".
- King, Hannah (10 July 2014). "The WW2 Battle Fought Across a Tennis Court 10.07.14". British Forces Broadcasting Service. — YouTube video of 70th commemoration of the battle held in York. It contains some historical footage of the battle.